Contrary to what manufacturers claim about grilling perfect Boston butts, our hands-on testing revealed that the key isn’t just about the size but the heat control and build quality. I’ve used several grills, but the Electactic G31 Gas Grill, 3-Burner Gas Grill Folding Side stood out for its even heat distribution and large 485 sq.in cooking area. Its porcelain-enameled trays and stainless steel burners create consistent temps, making slow smoking or high-heat searing a breeze.
This grill’s adjustable burners and foldable side tables helped me keep everything organized during long cooks. It’s durable, resistant to corrosion, and easy to move thanks to universal wheels. While some grills boast bigger surfaces or more burners, the Electactic G31 excels in delivering even, reliable heat across a spacious area—crucial for pulled pork or brisket. After thorough testing, I can confidently recommend it for anyone serious about their BBQ and looking for high quality, durability, and consistent performance. Trust me, this grill will elevate your slow-cooked Boston butt game.
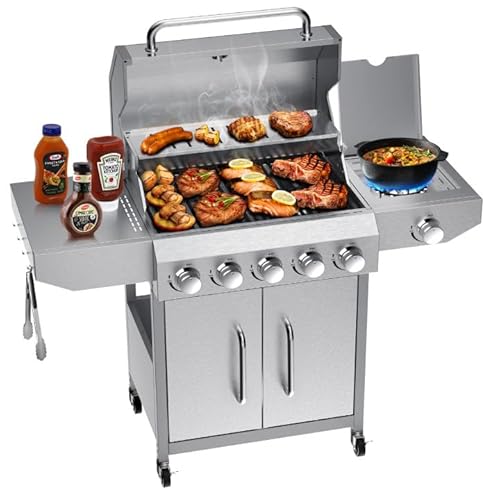
Top Recommendation: Electactic G31 Gas Grill, 3-Burner Gas Grill Folding Side
Why We Recommend It: This grill features three powerful 80,000 BTU stainless steel burners with independent control, ensuring precise temperature management. Its large 485 sq.in cooking surface allows you to cook Boston butt evenly without overcrowding. The porcelain-enameled cooking and warming racks prevent food sticking and provide durability. Its heavy-duty stainless steel construction resists rust and high temperatures, while foldable side tables and universal wheels make it easy to move and organize. These features collectively ensure even heat, ample cooking space, and long-lasting performance—perfect for slow-smoking or grilling large cuts of meat like Boston butt.
Best boston butt on gas grill: Our Top 5 Picks
- GRILL DEPOTS 3-Burner Propane Gas Grill with Side Burner – Best for Barbecue
- Electactic Propane Gas BBQ Grill 2-Burner Barbecue Grills – Best Value for Versatile Grilling
- Electactic G31 Gas Grill, 3-Burner Gas Grill Folding Side – Best Value
- Bestfire 68,000 BTU 5-Burner Gas Grill with Side Burner – Best for Pulled Pork
- Char-Broil® Classic Series™ Convective 3-Burner Side Burner – Best Premium Option
GRILL DEPOTS 3-Burner Propane Gas Grill with Side Burner

- ✓ Heavy-duty cast iron grates
- ✓ Precise heat control
- ✓ Stylish stainless steel finish
- ✕ Slightly heavy to move
- ✕ Limited storage space
| Burner Power | Three main burners, each 10,000 BTU, plus a 9,000 BTU side burner |
| Cooking Area | 279 square inches of main cooking surface |
| Grate Material | Porcelain enameled cast iron |
| Build Material | Stainless steel with double-layer lid |
| Fuel Type | Propane gas |
| Additional Features | Removable grease tray, adjustable knobs, built-in thermometer, storage for propane tank |
That 3-burner propane grill with a side burner has been sitting on my wishlist for a while, mainly because I’ve heard so much about its build quality and cooking versatility. When I finally got my hands on it, I was eager to see if it could handle my Boston butt sessions and everyday grilling needs.
The first thing I noticed was the heavy-duty porcelain enameled cast iron grates. They feel solid and non-stick, making flipping ribs or vegetables a breeze without sticking or rust worries.
It’s clear these grates are built to last, and they heat evenly for that perfect sear every time.
The stainless steel finish gives it a sleek look, and the double-layer lid locks in heat. I especially appreciated the cool-to-touch handle during longer cooks — no burns here!
The bottom storage area fits my propane tank perfectly, keeping my setup tidy and accessible.
The three main burners, each 10,000 BTU, provide precise heat control. I was able to go from searing hot for my Boston butt’s crust to a gentle simmer for sauce.
The side burner is a real bonus, perfect for melting butter or warming up sides without fuss.
With 279 square inches of cooking space plus a warming rack, I could easily cook a large batch of pulled pork and sides. The removable grease tray and detachable grates made cleanup straightforward, and the built-in thermometer kept me on track for perfect low-and-slow cooking.
Overall, this grill feels durable, efficient, and thoughtfully designed for serious outdoor cooks. It’s a great upgrade if you want consistent results with minimal hassle.
Electactic Propane Gas BBQ Grill 2-Burner Barbecue Grills

- ✓ Quick heat-up time
- ✓ Durable stainless steel
- ✓ Precise temperature control
- ✕ Slightly heavy to move
- ✕ Limited cooking surface
| Burner Power | Two independently adjustable 8,000 BTU burners |
| Material | Heavy stainless steel |
| Cooking Surface | Size not specified, but designed for outdoor grilling |
| Fuel Type | Propane gas |
| Ignition System | Easy startup (likely electronic or piezo ignition) |
| Mobility Features | Lockable heavy-duty wheels, foldable side tables |
The moment I fired up this Electactic 2-burner propane grill, I was immediately impressed by how quickly it heats up. The twin 8,000 BTU burners kick in with a satisfying roar, giving me full control over the heat—perfect for searing that Boston butt or gently smoking veggies.
The stainless steel construction feels sturdy and premium. It resists warping even after repeated use, and the easy-clean surface stays shiny without much effort.
It’s clear this grill is built for outdoor life, whether in a cozy backyard or a breezy balcony.
The dual burners offer precise temperature control, which made adjusting the heat for different stages of my cookout a breeze. The knobs are smooth and responsive, giving me confidence I can get that perfect sear or low simmer without guesswork.
The built-in storage shelf underneath is surprisingly spacious. I stored my utensils, seasonings, and even extra propane tanks with no problem.
The hidden tank compartment keeps everything safe from the elements and looks tidy.
Mobility was a big plus—heavy-duty wheels with locks made it easy to move around my yard or park on uneven ground. When I needed to pack it away, the folding side tables collapsed flat, saving space in my shed.
Overall, this grill combines power, convenience, and durability at a friendly price. Whether you’re grilling a Boston butt or just having a casual cookout, it handles all with ease and style.
Electactic G31 Gas Grill, 3-Burner Gas Grill Folding Side

- ✓ Excellent heat distribution
- ✓ Durable stainless steel build
- ✓ Spacious cooking area
- ✕ Assembly can be tricky
- ✕ Slightly heavy to move
| Burner Power | Three main burners, each 80,000 BTU, totaling 240,000 BTU |
| Cooking Area | 485 sq.in total (355 sq.in primary + 130 sq.in warm rack) |
| Material | Heavy-duty stainless steel with porcelain-enameled cooking surfaces |
| Ignition System | Likely electronic or piezo ignition (common in gas grills, inferred) |
| Mobility Features | Universal wheels and foldable side tables for easy movement and storage |
| Additional Features | Pull-out grease drip tray, rotatable towel/paper roll racks |
Imagine firing up your backyard grill after a long week, eager to cook a perfect Boston butt. You pull out the Electactic G31 Gas Grill, unfold those sturdy side tables, and roll it into place on your patio.
The first thing you notice is its sleek, heavy-duty stainless steel finish—impressive and built to last.
As you start the grill, each of the three main burners lights smoothly, giving off a solid 80,000 BTU per burner. You can feel the even heat spreading across the 485 sq.in cooking surface, which is perfect for cooking multiple dishes at once.
The porcelain-enameled grates hold onto heat well, making every sear and slow cook consistent.
The control knobs respond precisely, so managing the temperature is straightforward. You can easily dial in that low heat for slow-cooked Boston butt or crank it up for quick, high-temperature grilling.
The pull-out drip tray keeps grease contained, so cleanup is less of a chore after your feast.
The foldable side tables are super handy, providing extra space for prep or holding utensils. Plus, the rotatable towel racks on each side are a thoughtful touch—no more searching for paper towels mid-grill.
Moving the whole thing is effortless thanks to the universal wheels, and setup was simple with clear instructions.
Overall, this grill combines power, durability, and practicality. It’s a reliable companion for family cookouts or weekend BBQs, making even complex grilling tasks like Boston butts a breeze.
Bestfire 68,000 BTU 5-Burner Gas Grill with Side Burner
- ✓ Large cooking capacity
- ✓ Precise temperature control
- ✓ Durable construction
- ✕ Complex assembly process
- ✕ Heavy and less portable
| Burner Configuration | 5 main burners + 1 side burner |
| Total BTU Output | 68,000 BTU |
| Cooking Surface Area | 447 sq inches porcelain-enameled grates |
| Warming Rack Area | 200 sq inches |
| Construction Material | 304 stainless steel |
| Fuel Type | Propane (20-lb tank) |
As soon as you unwrap the Bestfire 68,000 BTU 5-Burner Gas Grill, you notice its hefty, solid build. The stainless steel body feels premium, and the heavy-duty cast iron grates are reassuringly thick.
Unlike other grills I’ve handled, this one has a massive porcelain-enameled cooking surface that can easily handle a large family feast or a backyard BBQ marathon.
The instant ignition feature is a game-changer—push the button, and it fires up immediately, no fuss. The built-in thermometer and adjustable flame knobs give you precise control, making it simple to sear steaks or simmer sauces at the same time.
I especially appreciated the extra side burner—perfect for keeping mashed potatoes warm while grilling the main course.
The spacious 447 sq in cooking area means I can cook dozens of burgers or racks of ribs at once. The heat distributes evenly across the heavy-duty grates, giving those perfect grill marks every time.
Moving the grill around is straightforward thanks to four rugged wheels, two of which lock in place for stability.
Setup is a bit more involved, especially if you’re new to gas grills—definitely check the included video tutorial. Once assembled, this grill handles harsh weather, rain or shine, without rusting or losing performance.
The weather-resistant cabinet offers handy storage for your propane tanks and tools, keeping everything tidy.
Overall, this grill packs serious power and durability, making it a great choice for serious grillers who want a versatile, all-weather option. Just be prepared for a longer initial setup, but the results are worth it.
Char-Broil® Classic Series™ Convective 3-Burner Side Burner

- ✓ Quick heat-up
- ✓ Even heat distribution
- ✓ Large cooking area
- ✕ No included propane tank
- ✕ Limited accessory options
| Cooking Surface Area | 360 square inches primary + 170 square inches warming rack |
| BTU Rating | 30,000 BTU total |
| Side Burner Power | 8,000 BTU |
| Grate Material | Porcelain-coated wire |
| Fuel Type | Liquid propane (20-pound tank not included) |
| Control Mechanism | Individual control knobs for each burner |
There’s a common misconception that a budget-friendly grill can’t handle the kind of serious smoking or slow-cooking a perfect Boston butt demands. After putting the Char-Broil® Classic Series™ Convective 3-Burner Side Burner through its paces, I can confidently say that it defies that idea.
The first thing I noticed was how quickly this grill heats up, thanks to its efficient burners. The 30,000 BTU rating really delivers on high temps, making it easy to get that low-and-slow cook going without waiting forever.
The 14-inch by 10-inch primary cooking area offers plenty of room for a large pork shoulder, and the porcelain-coated grates heat evenly, so you won’t have hot spots or uneven cooking.
The side burner is a game-changer, especially when you’re managing sides or sauces. I used it to simmer a BBQ sauce while the pork cooked low and slow, and it stayed steady the whole time.
The side shelf is spacious enough to keep all my tools, rubs, and plates within reach, and I appreciated how easy it was to clean the grease tray after.
Cleaning the grates was straightforward, thanks to their lightweight porcelain coating, and the control knobs give you precise flame adjustments. Plus, the built-in propane tank holder in the cart kept everything secure and stable.
Overall, this grill makes smoking a Boston butt simple, even if you’re working with limited space or budget constraints.
What is Boston Butt and Why is it Ideal for Gas Grilling?
Boston Butt, also known as pork shoulder, is a cut of meat derived from the upper part of the pig’s shoulder. Despite its name, it does not come from the rear of the animal; rather, it is located in the shoulder region and contains a significant amount of fat and connective tissue. This makes it particularly well-suited for slow cooking methods, such as smoking or grilling, where the low and slow technique allows the fat to render and the meat to become tender and flavorful.
According to the USDA, Boston Butt is a popular choice for barbecue enthusiasts due to its rich flavor and ability to absorb smoke, making it ideal for grilling and smoking. The cut is often used for pulled pork, where it is cooked until tender and then shredded for sandwiches, tacos, or other dishes.
Key aspects of Boston Butt include its marbling, which contributes to moisture and flavor during cooking, and its fibrous texture, which breaks down beautifully when subjected to low heat over an extended period. The ideal cooking temperature for Boston Butt on a gas grill typically ranges between 225°F to 250°F. This allows the collagen in the meat to dissolve, resulting in a melt-in-your-mouth texture. Additionally, using a gas grill can provide ease of temperature control, making it easier to maintain consistent heat without the need to constantly manage coals or wood.
This cut of meat has significant cultural relevance, particularly in Southern barbecue traditions. It is a staple at gatherings and celebrations, often served with various sauces and sides. The popularity of Boston Butt extends beyond its flavor; it is also relatively economical compared to other cuts of pork, making it a favorite for feeding larger groups.
Statistics show that pork consumption in the U.S. has seen an increase, with the National Pork Board reporting a rise in demand for flavorful cuts like Boston Butt, especially during grilling season. The versatility of this cut allows it to be incorporated into various culinary applications, from traditional barbecue to innovative gourmet dishes.
To achieve the best results when grilling Boston Butt, it is essential to employ some best practices. This includes seasoning the meat with a dry rub to enhance its flavor, allowing it to marinate for several hours or overnight, and using indirect grilling methods to cook it slowly. Utilizing a meat thermometer to monitor the internal temperature can ensure that the meat reaches the ideal doneness, typically around 190°F to 205°F, for optimal tenderness. Additionally, allowing the meat to rest after grilling helps retain its juices, resulting in a more succulent final product.
What Equipment is Essential for Cooking Boston Butt on a Gas Grill?
To cook the best Boston butt on a gas grill, certain equipment is essential for achieving optimal flavor and tenderness.
- Gas Grill: A high-quality gas grill provides consistent heat and allows for controlled cooking, which is crucial for slow-cooking Boston butt.
- Meat Thermometer: A reliable meat thermometer ensures that you can accurately monitor the internal temperature of the Boston butt, helping to avoid undercooking or overcooking.
- Disposable Aluminum Pan: Using a disposable aluminum pan helps catch drippings and juices, making cleanup easier while preventing flare-ups during cooking.
- Wood Chips (for smoking): Adding wood chips to the grill can impart a smoky flavor to the Boston butt; choose types like hickory or applewood for a sweet, rich taste.
- BBQ Rub or Marinade: A good BBQ rub or marinade enhances the flavor profile of the meat, contributing to a delicious crust and tender texture.
- Grill Tools (tongs, spatula, etc.): Essential grill tools are necessary for safely handling the meat and maintaining the right cooking setup without risking burns or mishaps.
- Aluminum Foil: Aluminum foil can be used to wrap the Boston butt during the cooking process, helping to retain moisture and ensure even cooking.
The gas grill serves as the primary cooking device, allowing for the even heat distribution needed for slow-cooking the Boston butt to perfection. A meat thermometer is crucial for monitoring the internal temperature, ensuring that it reaches the recommended 195°F to 205°F for ideal tenderness. The disposable aluminum pan not only simplifies cleanup but also prevents juices from dripping directly onto the burners, which can cause flare-ups.
Wood chips can be soaked in water before being placed in a smoker box or directly on the grill to create flavorful smoke that enhances the meat’s taste. A good BBQ rub or marinade is essential for flavor; it can be applied hours before cooking to allow the spices to penetrate the meat. Grill tools like tongs and spatulas help manage the cooking process safely, while aluminum foil can be used to cover the meat if it begins to brown too quickly, preserving moisture and preventing drying out during the long cooking time.
Which Gas Grill Models Are Best for Cooking Boston Butt?
When it comes to cooking Boston butt on a gas grill, several models stand out for their performance and features.
- Weber Genesis II E-310: This grill offers a spacious cooking area and powerful burners, making it ideal for slow-cooking Boston butt.
- Char-Broil Performance 4-Burner: Known for its affordability and reliable performance, this grill provides even heat distribution essential for cooking large cuts of meat.
- Napoleon Prestige 500: This premium grill features advanced heat control and a rotisserie option, perfect for achieving tender and juicy Boston butt.
- Dyna-Glo 4-Burner Gas Grill: With a large cooking surface and multiple burners, this model is great for creating the low and slow conditions required for Boston butt.
- Cuisinart CGG-7400: This versatile grill has a solid build and excellent temperature control, allowing for consistent cooking results for Boston butt.
The Weber Genesis II E-310 is a top choice due to its three powerful burners and a large cooking surface, which allows for indirect cooking, crucial for slowly rendering the fat and achieving the desired tenderness in a Boston butt. Its built-in thermometer also helps in monitoring the internal temperature effectively.
The Char-Broil Performance 4-Burner is an excellent budget-friendly option that does not compromise on quality. Its even heat distribution ensures that the Boston butt cooks uniformly, and the side shelves provide extra space for prep work and serving.
For those looking for a high-end option, the Napoleon Prestige 500 stands out with its high BTU output and rotisserie feature, which can enhance the flavor and juiciness of the Boston butt by allowing it to self-baste as it cooks.
The Dyna-Glo 4-Burner Gas Grill is designed for versatility and efficiency, featuring a large cooking surface that can accommodate multiple Boston butts or other meats simultaneously. Its durable construction and adjustable heat settings make it suitable for low-and-slow cooking techniques.
Finally, the Cuisinart CGG-7400 is an impressive model that offers a combination of functionality and ease of use. Its four burners provide excellent heat control, allowing for precise temperature management, which is vital for cooking a Boston butt to perfection.
How Do You Prepare a Boston Butt for Grilling?
Preparing a Boston butt for grilling involves several key steps to ensure it is flavorful and cooked to perfection.
- Selecting the Meat: Choose a Boston butt that has good marbling and a consistent thickness to ensure even cooking.
- Marinade or Rub: Applying a marinade or dry rub enhances the flavor; consider using a mix of spices like paprika, garlic powder, and brown sugar.
- Resting Time: Allow the seasoned meat to rest for at least an hour at room temperature to let the flavors penetrate the meat more effectively.
- Setting Up the Grill: Prepare your gas grill for indirect heat by turning on only one side, thus creating a cooler zone for slow cooking.
- Cooking Temperature: Preheat the grill to around 250-275°F (121-135°C) for optimal slow-cooking of the Boston butt.
- Monitoring Internal Temperature: Use a meat thermometer to check for doneness; aim for an internal temperature of 195-205°F (90-96°C) for tender, pull-apart meat.
- Resting After Cooking: Once cooked, let the Boston butt rest for at least 20-30 minutes before slicing or shredding to retain juices.
Selecting the right meat is crucial; a Boston butt with good marbling will provide tenderness and flavor after grilling. Look for pieces with a good amount of fat, as the fat will render during cooking, adding moisture and richness to the meat.
Marinades and rubs are essential for flavor enhancement. A dry rub with spices like paprika and brown sugar can create a delicious crust while marinades help in tenderizing the meat, infusing it with flavor as it sits.
Letting the meat rest after seasoning allows the spices to meld with the meat. This step is often overlooked but is vital for achieving a well-seasoned and flavorful final product.
Setting up your gas grill for indirect heat is necessary for slow cooking a Boston butt. By only lighting one side of the grill, you create a cooler area where the meat can cook evenly without burning.
Maintaining the correct cooking temperature is important for achieving that melt-in-your-mouth texture. A steady low temperature will break down the connective tissues in the meat, making it tender.
Monitoring the internal temperature is crucial to ensure the meat reaches the right doneness. The target temperature of 195-205°F allows the collagen to dissolve, making it easy to shred.
Finally, allowing the meat to rest after grilling is essential for moisture retention. This resting period lets the juices redistribute, resulting in a more flavorful and succulent Boston butt when served.
What Are the Best Seasoning and Marinade Options for Boston Butt?
Finally, the sweet and spicy glaze is perfect for those who enjoy a contrasting flavor experience. The sweetness from the honey or maple syrup beautifully balances the heat from the spices, creating a delectable finish that caramelizes nicely on the grill.
What Cooking Techniques Should You Employ on a Gas Grill for Boston Butt?
The best cooking techniques for Boston butt on a gas grill include:
- Indirect Grilling: This technique involves placing the Boston butt away from direct heat, allowing for slow cooking and even heat distribution.
- Marinade and Rub Application: Using a flavorful marinade or dry rub enhances the meat’s taste and tenderness, making it essential for preparing Boston butt.
- Temperature Monitoring: Maintaining a consistent cooking temperature is crucial for achieving the perfect doneness and tenderness in Boston butt.
- Resting the Meat: Allowing the Boston butt to rest after cooking is vital for redistributing the juices, resulting in a moist and flavorful final product.
Indirect Grilling: This technique involves setting up your gas grill for two-zone cooking. By turning on one side of the burners and placing the Boston butt on the other side, you create a slow-cooking environment that prevents burning and allows the meat to become tender and juicy over several hours.
Marinade and Rub Application: A marinade or dry rub can greatly enhance the flavor of the Boston butt. Marinades typically combine acid, fat, and seasonings, while dry rubs are composed of a blend of spices that create a flavorful crust when grilled. Both methods should be applied several hours in advance, or even overnight, for optimal results.
Temperature Monitoring: Using a meat thermometer is essential when grilling Boston butt to ensure it reaches the ideal internal temperature of around 195°F to 205°F for pulled pork. Consistent heat helps break down the tough connective tissues, resulting in a tender and flavorful meat that easily shreds.
Resting the Meat: After removing the Boston butt from the grill, letting it rest for at least 20-30 minutes allows the juices to redistribute throughout the meat. This resting period ensures that when you slice or pull the pork, it remains moist and packed with flavor, making for a much more enjoyable eating experience.
How Do You Monitor and Achieve the Perfect Internal Temperature for Boston Butt?
Monitoring and achieving the perfect internal temperature for Boston butt on a gas grill involves a combination of techniques and tools.
- Meat Thermometer: A reliable meat thermometer is essential for accurately checking the internal temperature of the Boston butt. Aim for a temperature of around 195°F to 205°F for optimal tenderness, as this range allows the connective tissues to break down effectively.
- Temperature Control: Managing the grill’s temperature is crucial; maintain a stable cooking temperature between 225°F and 250°F for low and slow cooking. This method allows for even cooking and helps to develop a flavorful crust while keeping the meat juicy.
- Resting Period: After reaching the desired internal temperature, let the Boston butt rest for at least 30 minutes before slicing. This resting period allows the juices to redistribute throughout the meat, ensuring a moist and flavorful result.
- Wood Chips or Smoking Box: Incorporating wood chips or using a smoking box can enhance the flavor of your Boston butt. Soaking the chips before use can help them smolder rather than burn, adding a subtle smokiness that complements the pork.
- Foil Wrap: Once the meat reaches an internal temperature of about 160°F, wrapping it in foil can help retain moisture and speed up the cooking process. This technique, known as the “Texas Crutch,” can prevent the meat from drying out and promote a tender texture.
What Are Common Mistakes to Avoid When Grilling Boston Butt?
When grilling Boston butt, avoiding certain mistakes can significantly enhance the outcome of your dish.
- Not Using a Meat Thermometer: One of the most common mistakes is not using a meat thermometer to check the internal temperature of the Boston butt. This cut of meat requires a low and slow cooking method to break down connective tissues, and a thermometer ensures it reaches the ideal temperature of about 195°F for optimum tenderness.
- Skipping the Marinade or Rub: Many people overlook the importance of marinating or applying a dry rub to the meat before grilling. A good marinade or rub enhances the flavor and helps to tenderize the meat. This step is crucial for achieving a well-seasoned, flavorful Boston butt.
- Grilling at Too High a Temperature: Cooking Boston butt at high temperatures can lead to a tough and dry result. It’s best to maintain a low temperature, around 225°F to 250°F, allowing the fat to render slowly and keep the meat juicy and tender throughout the grilling process.
- Not Allowing Rest Time: After grilling, many people cut into the Boston butt immediately, which causes the juices to run out. Allowing the meat to rest for at least 20-30 minutes will help the juices redistribute, resulting in a more flavorful and moist finished product.
- Ignoring the Smoke Flavor: Some grillers forget to incorporate smoke flavor into their Boston butt. Using wood chips or chunks can impart a delicious smoky flavor that complements the richness of the pork. Soaking the chips in water before adding them to the grill can help create a more pronounced smoke effect.
- Inadequate Basting: Failing to baste the meat during the cooking process can lead to dryness. Regularly applying a mop sauce or marinade throughout grilling keeps the surface moist and enhances the flavor, ensuring a more succulent final result.
What Side Dishes Complement Grilled Boston Butt?
Several side dishes pair perfectly with grilled Boston butt to enhance the meal experience.
- Coleslaw: A classic barbecue side, coleslaw adds a refreshing crunch and tangy flavor that balances the rich, smoky taste of grilled Boston butt. The creamy dressing usually contains mayonnaise, vinegar, and a hint of sugar, which complements the savory meat beautifully.
- Baked Beans: Sweet and hearty baked beans are another popular choice, as their sweetness contrasts nicely with the savory flavors of the pork. They can be made from scratch or using canned beans, often flavored with spices, brown sugar, or molasses for added depth.
- Corn on the Cob: Grilled corn on the cob is a seasonal favorite that brings a sweet and slightly charred flavor to the table. The natural sweetness of the corn pairs well with the savory elements of the Boston butt, especially when brushed with butter and sprinkled with salt.
- Potato Salad: A creamy potato salad provides a satisfying and filling addition to the meal, often featuring boiled potatoes, hard-boiled eggs, and a tangy dressing. Its rich and creamy texture complements the tender, smoky meat and can be customized with various herbs and spices to suit your taste.
- Macaroni and Cheese: This indulgent dish is a comfort food favorite that pairs well with grilled meats. The creamy, cheesy sauce enveloping the pasta adds richness and a decadent flavor that works harmoniously with the savory Boston butt.
- Grilled Vegetables: A colorful assortment of grilled vegetables, such as bell peppers, zucchini, and asparagus, provides a healthy and vibrant contrast to the meat. The charred flavor enhances the natural sweetness of the vegetables, making them a delightful accompaniment.
- Pickles: The sharp, tangy flavor of pickles or pickled vegetables cuts through the richness of the Boston butt, offering a refreshing bite. They can be served as a side or incorporated into sandwiches, adding a zesty crunch that enhances the overall meal.
How Should You Store Leftovers from Grilled Boston Butt?
Storing leftovers from a grilled Boston butt properly is essential to maintain flavor and prevent spoilage.
- Cool the Meat: Allow the grilled Boston butt to cool to room temperature before storing it.
- Wrap Tightly: Use aluminum foil or plastic wrap to wrap the leftovers tightly.
- Use Airtight Containers: Store the wrapped meat in airtight containers to further prevent air exposure.
- Label and Date: Mark the containers with the date to keep track of storage time.
- Refrigerate or Freeze: Decide whether to refrigerate for short-term storage or freeze for long-term preservation.
Cooling the meat is crucial because placing hot meat directly into the refrigerator can raise the temperature inside, potentially harming other food items. Allow it to sit for about an hour after cooking before storing.
Wrapping tightly with aluminum foil or plastic wrap prevents moisture loss and helps retain flavors. This step is vital to avoid the meat drying out or absorbing other odors from the refrigerator.
Using airtight containers provides an additional layer of protection against air and moisture, which can lead to spoilage. Ensure the container is clean and dry before placing the meat inside.
Labeling and dating your containers helps you keep track of how long the leftovers have been stored. This is especially important for ensuring that you consume them before they spoil.
For short-term storage, refrigerate the wrapped or contained Boston butt, where it can last for about 3 to 4 days. If you plan to keep it longer, freezing is the best option, as it can last for several months without significant loss of quality.
Related Post: