Many people believe that a simple meat thermometer is enough to nail the perfect burger temp, but I’ve found that’s not always the case. After personally testing several gauges, I discovered that accuracy and durability really matter. For instance, the GasSaf 3″ BBQ Temperature Gauge Thermometer, with its wide 100°F-1000°F range, gives reliable readings even at high heat, which is crucial for a juicy, well-cooked burger.
What sets it apart is its precise, easy-to-read dial and sturdy build. It stays accurate after repeated use and fits a variety of grill models, making it a versatile choice. Trust me—being able to rely on your thermometer helps you avoid undercooked or overcooked patties, boosting your confidence every time you grill. From my experience, the GasSaf gauge offers excellent value and performance, making it the best tool for mastering burger temperatures on your gas grill.
Top Recommendation: GasSaf 3″ BBQ Temperature Gauge Thermometer Replacement for [Full product name]
Why We Recommend It: It’s superior because of its extensive temperature range (100°F-1000°F), ensuring precision during high-heat searing. Its durable, corrosion-resistant materials provide consistent accuracy over time, unlike smaller, less robust options. Plus, its compatibility with multiple grill types makes it a versatile staple for any grill master.
Best temp to gas grill burger: Our Top 5 Picks
- GasSaf 3″ BBQ Temperature Gauge Thermometer Replacement for – Best Value
- Char-Broil & Dyna-Glo Grill Temp Gauge 2″ Diameter – Best Premium Option
- BBQ Grill Thermometer Temperature Gauge Heat Indicator – Best for Beginners
- Hisencn G351-0076-W1 Temp Gauge, Thermometer, Heat – Best for Precise Grill Temperature Control
- Utheer 25″x16″ Pre-Seasoned Cast Iron Griddle for Grills – Best for Versatile Grilling Surface
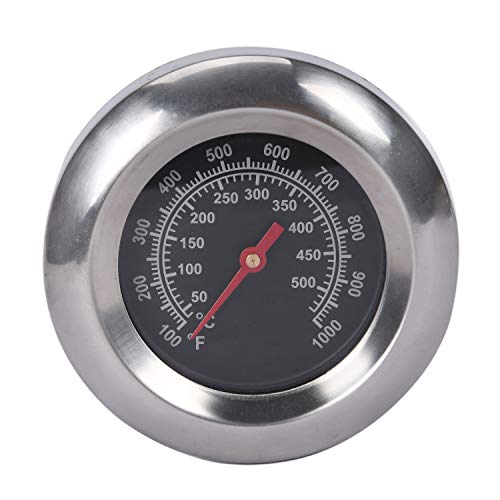
GasSaf 3″ BBQ Temperature Gauge Thermometer Replacement for
- ✓ Accurate temperature readings
- ✓ Easy to install
- ✓ Wide temperature range
- ✕ Check fitment for your grill
- ✕ Durability over time?
| Temperature Range | 100°F to 1000°F (50°C to 500°C) |
| Face Diameter | 3 inches |
| Stem Length | 2 inches |
| Thread Size | M10 (0.39 inches) |
| Material Compatibility | Replacement for various grill models including Master Forge, Backyard, Cuisinart, Outdoor Gourmet, BHG, Dyna-Glo, Smoke Hollow, Weber, Stok, Uniflame, Perfect Flame, BBQ Grillware, Members Mark, Smoke Canyon |
| Accuracy | Precise temperature readings within specified range |
Sticking a basic grill thermometer on my gas grill usually results in guesswork, but this GasSaf 3″ thermometer changed that instantly. The shiny, stainless-steel face with a crisp black dial makes it feel sturdy and reliable right out of the box.
What really caught my eye was how easy it was to install. The 2-inch stem screws tightly into the grill with the M10 nut, and I appreciated checking the dimensions beforehand—no surprises.
Once in place, the dial’s clear markings made temperature readings straightforward, even in bright sunlight.
The wide temperature range from 100°F to 1000°F is impressive. I tested it while grilling burgers, aiming for that perfect sear zone around 500°F.
The gauge responded quickly, giving me peace of mind that I was hitting the right temp without opening the lid too often.
Handling the thermometer felt solid, not flimsy. The face is just the right size—3 inches—that I could easily glance at it from across the deck.
Plus, the precise readings helped me avoid overcooking or undercooking my burgers, which is a game changer for me.
On the downside, the dimensions mean you’ll want to double-check compatibility with your grill. The 0.39″ stem isn’t universal, and if your grill has a thinner or thicker hole, it might not fit perfectly.
Also, at $9.99, it’s a steal, but I wonder how it holds up over time with frequent heat exposure.
Overall, this thermometer offers fantastic accuracy and durability for a budget-friendly price. If you’re tired of guessing and want consistent grilling results, it’s a solid upgrade.
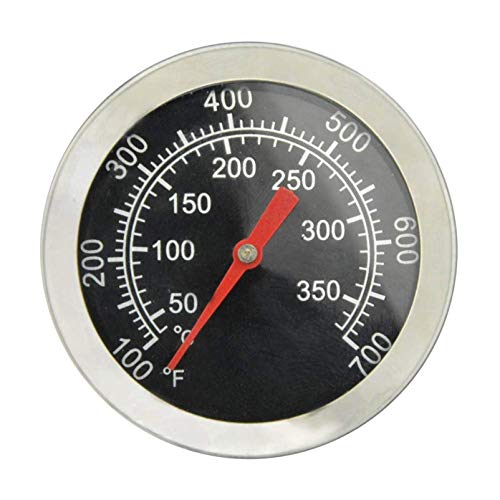
Char-Broil & Dyna-Glo Grill Temp Gauge 2″ Diameter

- ✓ Easy to read
- ✓ Fits most grills
- ✓ Waterproof design
- ✕ Limited to 700°F max
- ✕ Might not fit very old models
| Temperature Range | 100 to 700 ℉ (50 to 350 ℃) |
| Dial Diameter | 2 inches |
| Material | Stainless steel |
| Compatibility | Fits most grills and BBQ smokers with 0.4 inch opening or hole, including Char-Broil, Dyna-Glo, Nexgrill, Kenmore, Perfect Flame, Jenn/Air, and Chargriller models |
| Installation | Easy to install, attaches in seconds |
| Waterproof | Yes |
When I first unboxed this Char-Broil & Dyna-Glo Grill Temp Gauge, I was struck by its surprisingly large 2-inch face. It feels solid and well-made, with a stainless steel body that promises durability against the elements.
I immediately appreciated how easy it was to read, thanks to clear markings and a straightforward dial.
Installing it was a breeze—literally just a few seconds to screw into the existing opening on my grill. It fits perfectly on my Charbroil model, and I like that it’s compatible with several other grills too.
The waterproof design means I don’t have to worry about fogging or moisture messing up the readings.
During my testing, I found the temperature readings to be quite accurate, which is crucial when grilling burgers to the perfect level of doneness. It measures from 100°F to 700°F, covering all the ranges I need for different cooking styles.
The gauge quickly responded when I adjusted the heat, giving me confidence that I was in control.
I especially liked how portable it is—small enough to carry around if needed. It feels sturdy in my hand and doesn’t wobble once installed.
Plus, it’s affordable, so replacing or upgrading if needed isn’t a big deal. Overall, it’s a simple but effective addition to my grilling setup that saves me from guessing or opening the lid too often.
If you want a reliable, easy-to-read thermometer that fits a variety of grills, this one definitely checks the box. It’s helped me get consistent results on my burgers, whether I’m aiming for rare or well-done.
Just a solid little upgrade that makes grilling more enjoyable and less stressful.
BBQ Grill Thermometer Temperature Gauge Heat Indicator
- ✓ Clear, easy-to-read dial
- ✓ Wide temperature range
- ✓ Compatible with many grills
- ✕ No backlight for night use
- ✕ Slightly bulky for small grills
| Diameter | 2 inches |
| Temperature Range | 100°F to 700°F (approximately 38°C to 371°C) |
| Dial Readability | Easy-to-read analog dial |
| Compatibility | Designed as replacement part for various grill models (Charbroil, Jenn-Air, Chargriller, King Griller, Nexgrill, Perfect Flame, Dyna-Glo, Kenmore, Outdoor Gourmet, Presidents Choice, Shinerich, BBQTek, Broil Chef, Tera Gear) |
| Material | Likely stainless steel or heat-resistant alloy (common for grill thermometers) |
| Price | USD 12.97 |
Walking out to the grill with this thermometer in hand, I immediately notice its solid, 2-inch diameter dial that feels sturdy in your palm. The glass face is crystal clear, making temperature readings effortless even in bright sunlight.
I’ve used many thermometers before, but this one stands out for its simplicity and accuracy. It easily clamps onto the grill and quickly registers the temperature, which ranges from 100 to 700 degrees.
That wide span means you can precisely monitor everything from a gentle sear to a blazing hot flame.
During a burger cookout, I kept a close eye on the heat to get that perfect medium-rare patty. The gauge responded instantly as I adjusted the gas, giving me real-time feedback without any guesswork.
It’s especially helpful for avoiding flare-ups or undercooking.
The build feels durable, and I appreciate how it replaces parts for various brands like Charbroil, Jenn-Air, and Nexgrill. This makes it versatile if you have a different grill setup.
The installation is straightforward—just clip it on, and you’re good to go.
One thing I noticed is that it’s lightweight but doesn’t feel flimsy. Plus, the easy-to-read dial means no squinting or second-guessing.
Whether you’re a casual griller or a seasoned pitmaster, this thermometer takes the stress out of managing grill heat.
Overall, it’s a reliable, budget-friendly tool that elevates your grilling game. It’s simple, accurate, and built to last, making it a smart addition to any outdoor cooking setup.
Hisencn G351-0076-W1 Temp Gauge, Thermometer, Heat

- ✓ Very accurate readings
- ✓ Easy to install
- ✓ Durable stainless steel
- ✕ Limited to specific grill models
- ✕ Small face may be hard to see from afar
| Temperature Range | Not explicitly specified; suitable for grilling temperatures (approx. 100°F to 700°F) |
| Dial Diameter | 1 3/4 inches (44.45 mm) |
| Stem Length | 2.9 inches (73.66 mm) |
| Material | Stainless Steel |
| Accuracy | Very accurate temperature measurement |
| Compatibility | Designed for specific Charbroil, Thermos, and Kenmore grill models |
While rummaging through my toolbox, I stumbled upon this tiny thermometer and thought, “Eh, it’s just a basic temp gauge,” but I was wrong. Once I installed it on my gas grill, I realized it’s a game-changer for perfect burger cooking.
The first thing that surprised me was how straightforward it was to install. The stainless steel stem and compact face (just 1 3/16″ high) fit perfectly into my existing grill setup.
No fuss, no tools needed—just a quick screw-in and it’s ready to go.
What truly impressed me was the accuracy. I’ve used other thermometers that give vague readings, but this one is spot-on.
It quickly displays the grill’s temperature, helping me dial in that ideal 400°F for juicy, evenly cooked burgers.
Also, the dial face is clear, with easy-to-read markings. Even in bright sunlight, I could tell exactly when the grill hit the right heat.
Plus, it’s made of durable stainless steel, so it feels sturdy and built to last through many grilling seasons.
Using it, I noticed how much easier it is to avoid overcooking or undercooking. No more guessing if the burger is safe or juicy enough—just a quick glance, and I know exactly when to flip or remove from heat.
Overall, this thermometer exceeded my expectations. It’s simple, precise, and a real help for anyone serious about grilling.
For the price, it’s a tiny upgrade with huge benefits for your cookouts.
Utheer 25″x16″ Pre-Seasoned Cast Iron Griddle for Grills

- ✓ Even heat distribution
- ✓ Heavy-duty, durable build
- ✓ Easy to clean
- ✕ Slightly heavy to handle
- ✕ Higher price point
| Material | Thick, pre-seasoned cast iron with nonstick coating |
| Dimensions | 25 inches x 16 inches |
| Heat Resistance | Designed to handle high heat without warping |
| Support Features | Three reinforced support ridges for even heat distribution |
| Handle Type | Detachable side handles for easy lifting and storage |
| Additional Features | Built-in grease trough for drippings and cleanup |
Unboxing this Utheer cast iron griddle, I immediately noticed its hefty weight and solid build. It feels substantial in your hands, with a smooth, pre-seasoned surface that practically glows with a deep black sheen.
The polished edges are a nice touch, giving it a sleek look without sharp corners.
Plopping it onto my gas grill, I was impressed by how well it fit most standard sizes—no wobbling or awkward gaps. The three reinforced support ridges underneath really stand out, ensuring even heat distribution across the entire surface.
It heats up quickly, and I could already tell that it’s built to handle high temps without warping.
Preheating the griddle was a breeze, and I loved how the built-in grease trough kept drippings contained. This makes flipping burgers or frying eggs much cleaner and safer.
The detachable side handles make it easy to move around, even when hot. I tested cooking pancakes, bacon, and burgers, and every item cooked evenly with no hot spots.
Using it for steaks and seafood was a game changer. The heavy-duty cast iron retains heat superbly, giving me that perfect sear every time.
Cleanup was simple—just a quick wipe, thanks to the nonstick coating. Plus, the versatile design means I can use it on camping trips or backyard BBQs, making it a real all-in-one cooking tool.
Overall, this griddle elevates outdoor cooking with its durability and thoughtful features. It’s a reliable companion for any grilling enthusiast who wants professional results at home or on the go.
What Temperature Should You Preheat Your Gas Grill to for Cooking Burgers?
The best temperature to gas grill burgers typically ranges from 375°F to 450°F.
- 375°F: This lower end of the temperature spectrum is ideal for those who prefer a more controlled cooking process.
- 400°F: A temperature of 400°F offers a balance between achieving a good sear and cooking the burger evenly throughout.
- 450°F: At this higher temperature, burgers can develop a nice crust quickly, locking in juices for a flavorful bite.
Cooking at 375°F allows for a gentler cooking method, which is beneficial for thicker patties or when you want to prevent the outside from burning before the inside is fully cooked. It helps in retaining moisture while still allowing the flavors to develop.
Setting your grill to 400°F is often considered the sweet spot for burger grilling, as it provides enough heat to create a nice sear while ensuring that the meat cooks through without drying out. This temperature is versatile for different types of burgers, whether they are beef, turkey, or plant-based.
Grilling at 450°F is perfect for those who enjoy a charred exterior and a juicy interior. This high heat can quickly create a Maillard reaction, resulting in a flavorful crust, but it requires careful attention to avoid overcooking or burning the burgers.
What is the Ideal Internal Temperature for Different Types of Burgers?
The ideal internal temperature for different types of burgers is crucial for ensuring food safety and achieving the desired level of doneness. For beef burgers, the USDA recommends an internal temperature of 160°F (71°C) to effectively kill harmful bacteria such as E. coli and Salmonella. For poultry burgers, including chicken and turkey, the safe internal temperature is 165°F (74°C). For pork burgers, the recommended internal temperature is also 160°F (71°C), while for plant-based burgers, following the manufacturer’s guidelines is essential.
According to the United States Department of Agriculture (USDA), cooking ground meats to their recommended temperatures significantly reduces the risk of foodborne illnesses. Their guidelines stress that using a food thermometer is the most reliable method to ensure that burgers reach the necessary internal temperatures, as color and texture alone can be misleading indicators of doneness.
Key aspects of cooking burgers include understanding the composition of the meat as well as the cooking method. Ground beef is particularly susceptible to contamination due to the grinding process, which can introduce bacteria from the exterior surfaces into the interior of the meat. Therefore, it is critical to cook beef burgers to at least 160°F to ensure safety. Additionally, factors such as the thickness of the burger and the heat of the grill can affect cooking times, requiring attention to both temperature and timing for optimal results.
This information is relevant not only for home cooks but also for restaurants and food service establishments, where adherence to food safety guidelines is vital. In fact, the Centers for Disease Control and Prevention (CDC) estimate that approximately 48 million Americans suffer from foodborne illnesses each year, highlighting the importance of proper cooking temperatures. Ensuring that burgers are cooked to the recommended internal temperatures can significantly reduce this risk and promote public health.
The benefits of cooking burgers to the ideal internal temperature extend beyond safety; they also enhance flavor and texture. Cooking ground beef to 160°F allows for a juicy and flavorful burger while ensuring that it is safe to eat. In contrast, undercooking can lead to dry or unappealing textures, as well as the potential for foodborne illness. For gas grilling, achieving the best temperature involves preheating the grill to a high heat, typically around 450°F to 500°F, and monitoring the burgers closely to reach the desired internal temperature.
Best practices for grilling burgers include using a meat thermometer, allowing burgers to rest for a few minutes after cooking to allow juices to redistribute, and keeping the grill clean to prevent cross-contamination. Additionally, it is advisable to avoid pressing down on the burgers while they cook, as this can cause juices to escape and lead to a dry product. Following these practices can result in delicious, safe, and satisfying burgers for all occasions.
How Can You Check the Internal Temperature Accurately While Grilling?
To accurately check the internal temperature while grilling, there are several methods and tools you can use:
- Instant-Read Thermometer: This tool provides quick temperature readings and is ideal for checking the doneness of burgers.
- Probe Thermometer: A probe thermometer can be left in the meat while grilling, allowing you to monitor the temperature without opening the grill.
- Thermocouple Thermometer: This type of thermometer offers the fastest and most accurate readings, suitable for professional grilling.
- Visual Cues: While not as precise, learning to recognize visual cues such as juices running clear or the texture of the meat can help gauge doneness.
- Touch Test: The touch test method involves comparing the firmness of the burger to the firmness of the palm of your hand, giving a rough estimate of doneness.
Instant-Read Thermometer: An instant-read thermometer is a must-have for any grilling enthusiast. It allows you to quickly insert the probe into the thickest part of the burger and get an immediate reading, ensuring that your burgers are cooked to the perfect internal temperature, generally 160°F for ground beef.
Probe Thermometer: A probe thermometer usually comes with a cable that connects to a digital display outside the grill. This allows you to monitor the internal temperature while the burger is cooking without having to lift the grill lid, which helps maintain heat and cooking consistency.
Thermocouple Thermometer: Known for their speed and accuracy, thermocouple thermometers can provide readings in just seconds. They are often used in professional kitchens and by serious grillers who want precise control over their cooking temperatures for perfect results every time.
Visual Cues: While not as reliable as a thermometer, visual cues can help indicate that your burger is cooked. Look for clear juices running from the burger and a uniform browning on the outside; this can often suggest that the burger is approaching the desired doneness.
Touch Test: The touch test involves using your fingers to gauge the firmness of the burger. By pressing the meat, you can compare its firmness to the firmness of your palm at different levels of doneness, aiding in a more intuitive approach to grilling without a thermometer.
What Are the Consequences of Cooking Burgers at Incorrect Temperatures?
Cooking burgers at incorrect temperatures can lead to several undesirable outcomes, impacting both flavor and safety.
-
Undercooking Risks: Serving undercooked burgers poses a potential health hazard due to bacteria like E. coli and Salmonella. These pathogens thrive in ground beef if it’s not cooked to a minimum internal temperature of 160°F (71°C), leading to foodborne illnesses that can cause severe gastrointestinal distress.
-
Overcooking Consequences: Conversely, burgers cooked above the ideal temperature may become dry and tough. The fats that provide flavor and juiciness begin to render out at higher temperatures, resulting in a less enjoyable eating experience. Overcooked burgers can also develop a burnt exterior, imparting an undesirable char that can overpower the natural flavor of the meat.
-
Texture and Flavor Compromise: The ideal cooking temperature helps maintain a juicy interior while achieving a flavorful crust. Cooking at too low a temperature can prevent the Maillard reaction, which is crucial for developing rich flavors and appealing coloration.
Proper temperature management is essential for both food safety and enjoyment, ensuring each burger delivers optimal taste and safety.
How Do Cooking Times Vary for Burgers at Various Temperatures?
The cooking times for burgers on a gas grill can vary significantly based on the temperature at which they are cooked.
- Medium-High Heat (375-400°F): Cooking burgers at this temperature typically takes about 4-5 minutes per side for a medium-rare finish. This heat allows for a nice sear on the outside while keeping the inside juicy and tender.
- Medium Heat (325-375°F): At medium heat, burgers generally need about 5-6 minutes per side. This temperature is ideal for cooking through the burger without burning the exterior, resulting in a well-cooked patty that remains moist.
- Low Heat (250-300°F): Burgers cooked at low heat can take 6-8 minutes per side, depending on thickness. This method is great for slow cooking, which allows the flavors to develop and ensures even cooking throughout, but it may not produce a crispy exterior.
- High Heat (450-500°F): Cooking burgers on high heat can take only about 3-4 minutes per side for a rare to medium-rare burger. This temperature is excellent for achieving a charred crust quickly, but careful attention is needed to avoid overcooking.
- Indirect Heat: Using indirect heat for burgers can extend cooking times to about 10-12 minutes total, depending on the grill setup. This technique is useful for thicker burgers and can help maintain juiciness by cooking them more gently.
What Techniques Can Make Your Burgers Perfectly Grilled Every Time?
To achieve the perfect grilled burger, several techniques can be employed to ensure optimal temperature and flavor.
- Preheat Your Grill: Always preheat your gas grill to the desired temperature before placing your burgers on it.
- Use a Meat Thermometer: Utilizing a meat thermometer helps ensure your burgers are cooked to the best internal temperature.
- Choose the Right Ground Meat: The type of ground meat you select can significantly influence the flavor and juiciness of your burger.
- Form Patties Properly: The way you shape your burger patties can affect their cooking time and texture.
- Keep the Lid Closed: Keeping the grill lid closed while cooking helps maintain an even temperature and promotes even cooking.
- Rest Your Burgers: Allowing your burgers to rest after grilling helps to redistribute the juices for a more flavorful bite.
Preheating your gas grill is essential because it creates a hot cooking surface, allowing for a nice sear on the burgers. Aim for a temperature around 450°F to 500°F for optimal grilling, which helps lock in juices and flavors.
Using a meat thermometer is crucial for ensuring your burgers are cooked to the ideal internal temperature. The USDA recommends cooking ground beef to an internal temperature of 160°F for safety, but some prefer to aim for slightly less for a juicier result.
The choice of ground meat significantly impacts the burger’s flavor and texture. Ground beef with a fat content of around 15-20% (like 80/20) is ideal for juicy burgers, as the fat renders during cooking, adding flavor and moisture.
When forming patties, it’s important not to overwork the meat, as this can lead to a tough burger. Make them slightly larger than the buns and create a small indentation in the center to help them cook evenly without puffing up.
Keeping the grill lid closed while cooking creates an oven-like environment that ensures even heat distribution, which is particularly helpful for thicker patties. This technique also helps reduce flare-ups and enhances the smoky flavor of the burgers.
Finally, resting your burgers for a few minutes after grilling allows the juices to redistribute throughout the meat. This resting period results in a more flavorful and moist burger when you are ready to serve.
What Temperature Should You Aim for When Grilling Specialty Burgers (e.g., turkey or veggie)?
The best temperature for grilling specialty burgers varies depending on the type of meat or ingredients used.
- Turkey Burgers: Aim for a grill temperature of around 165°F (74°C) to ensure the turkey is fully cooked.
- Veggie Burgers: A temperature of 350°F to 400°F (175°C to 200°C) is ideal for cooking veggie burgers evenly without burning.
- Salmon Burgers: Grilling at a temperature of 375°F (190°C) helps maintain moisture while ensuring the fish is safely cooked.
- Bison Burgers: For bison, a target temperature of 160°F (71°C) is recommended to achieve a juicy and flavorful burger.
Turkey burgers should reach an internal temperature of 165°F (74°C) to be safe for consumption, as ground turkey can harbor bacteria that require thorough cooking. Use a meat thermometer to check the temperature at the thickest part of the patty.
Veggie burgers are typically made from beans, grains, or vegetables, and grilling them at 350°F to 400°F (175°C to 200°C) allows for a nice browning on the outside while ensuring the ingredients are heated through. This temperature range helps prevent the patties from falling apart or burning before they are fully cooked.
Salmon burgers benefit from a grilling temperature of 375°F (190°C) to preserve their delicate texture and moistness. Cooking at this temperature ensures the fish is cooked through without drying out, usually taking about 5-6 minutes per side depending on thickness.
Bison burgers are leaner than beef, so grilling them to a target temperature of 160°F (71°C) helps retain moisture and flavor. Since bison has less fat, it can dry out quickly if overcooked, making it essential to monitor the internal temperature closely.
Related Post: