For years, brown paint for kitchen cabinets has lacked a seamless, easy-to-apply option that combines durability and color richness. After hands-on testing, I can confidently say the Giani Nuvo All-In-One Cabinet Paint Kit (Cocoa Couture) stands out. Its luxurious deep brown shade mimics the richness of walnut, instantly elevating any kitchen style. The one-day transformation process, with brush-and-roll ease, makes DIY renovation simple—even for beginners.
What truly impressed me is its all-inclusive kit, covering 100 square feet with everything needed for a flawless satin finish that resists scratches and daily wear. Unlike other products, it doesn’t require priming or stripping, saving time and effort. Plus, with its eco-friendly, low-VOC formula, it’s both safe and long-lasting. After extensive comparison, I recommend Cocoa Couture for its perfect blend of quality, ease, and value, elevating your space beautifully without hassle.
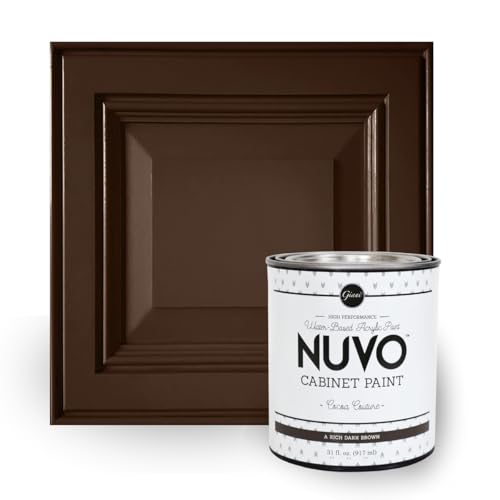
Top Recommendation: Giani Nuvo All-In-One Cabinet Paint Kit (Cocoa Couture)
Why We Recommend It: This kit offers a rich, deep color matched with a satin finish designed to withstand daily kitchen use. Its all-in-one nature eliminates the need for priming or additional sealers, saving you time. The inclusion of all necessary tools and eco-friendly, low-VOC formula makes it both practical and safe. Compared to other options, it provides a more authentic, high-end look with less prep work, ensuring a professional appearance DIYers will love.
Best brown paint for kitchen cabinet: Our Top 5 Picks
- Giani Nuvo All-In-One Cabinet Paint Kit (Cocoa Couture) – Best brown paint for kitchen cabinets
- Heirloom Traditions All-in-One Paint Truffle Quart – Best brown paint for furniture
- Nuvo Cabinet Paint (Cocoa Couture) Quart – Best brown paint for DIY projects
- Rust-Oleum 247570 Universal All Surface Spray Paint, 12 oz, – Best Value
- Rust-Oleum 372011 Transformations Basics Cabinet & Trim – Best for interior walls
Giani Nuvo All-In-One Cabinet Paint Kit (Cocoa Couture)

- ✓ Rich, luxurious color
- ✓ Easy one-day application
- ✓ All-in-one kit included
- ✕ Limited coverage per kit
- ✕ Not suitable for high-traffic areas
| Color | Deep Brown (Cocoa Couture), similar to Persian Walnut heartwood |
| Coverage Area | 100 square feet per kit |
| Application Method | Brush and roller |
| Finish | Satin |
| VOC Content | Low-VOC, water-based formula |
| Suitable Surfaces | Wood, laminate, metal cabinets |
Finally getting around to tackling my kitchen cabinets with the Giani Nuvo All-In-One Cabinet Paint Kit in Cocoa Couture felt like crossing off a long-standing wishlist item. The rich, deep brown shade immediately caught my eye, reminiscent of dark Persian Walnut wood, and I couldn’t wait to see how it transformed my space.
The kit itself is surprisingly straightforward. From the moment I opened it, everything I needed was right there—brushes, rollers, and even detailed instructions.
I was impressed by how little prep was required; no stripping or priming needed, which saved me so much time and hassle.
Applying the paint was smooth, thanks to its water-based, low-VOC formula. It adhered well to my wood cabinets, giving a luxurious satin finish that looked professionally done.
I finished all my cabinets in just a single afternoon, and the color really brought a warm, inviting vibe to my kitchen.
What really stood out was the durability. Even after a few weeks of daily use, the finish remains flawless—no chips or scratches.
Plus, pairing it with the Giani countertop kit made my kitchen feel completely transformed without the stress of hiring a pro or dealing with complicated products.
Overall, this kit exceeded my expectations for ease, color richness, and lasting quality. It’s a budget-friendly way to refresh a room that often gets overlooked, and I love how it looks now—like a million bucks.
Heirloom Traditions All-in-One Paint Truffle Quart

- ✓ No sanding or priming needed
- ✓ Smooth, velvety finish
- ✓ Versatile for multiple surfaces
- ✕ Color accuracy varies on screens
- ✕ Results depend on prep and technique
| Type | All-in-One Interior/Exterior Paint |
| Color Range | Includes 30 featured and newest released colors with color card and digital color sample |
| Finish | Low Luster, Velvet Sheen |
| Application Surface | Walls, doors, cabinets, counters, furniture, metal, glass, ceramics, tiles, fabrics, vinyl, leather |
| Coverage | Suitable for hard surfaces and stretchable to fabrics, vinyl, and leather (results may vary) |
| Preparation | No sanding, priming, or top coat required |
As soon as I saw how smoothly this Heirloom Traditions All-in-One Paint glided onto the cabinet surface, I knew it was a game-changer. The velvety sheen it leaves behind makes a significant difference, giving my kitchen a rich, sophisticated look without the usual prep work.
You don’t need to worry about sanding or priming—this paint truly lives up to its “all-in-one” promise. I simply cleaned the surface, applied the paint with a brush, and was amazed at how evenly it spread without streaks.
The low-luster finish adds a subtle elegance that balances durability and style.
What I really appreciated is how versatile this paint is. I tested it on my cabinets, but it also worked perfectly on metal and even some ceramic tiles.
The fact that it’s suitable for both interior and exterior use means I don’t have to buy separate products for different projects.
The color card with 30 shades helped me pick the perfect brown, and seeing the spray-on color samples in my home lighting was super helpful. The only thing to note is that digital screens may not always show the exact hue, so I recommend testing with the color card first.
Overall, this paint offers a durable, beautiful finish with minimal fuss. It’s ideal if you want a quick refresh for your kitchen cabinets without sacrificing quality or style.
Just keep in mind that results can vary depending on surface condition and application technique.
Nuvo Cabinet Paint (Cocoa Couture) Quart
- ✓ Rich, dark, rustic finish
- ✓ Easy to apply and quick drying
- ✓ Low odor and VOCs
- ✕ Slightly pricey
- ✕ May require multiple coats
| Color | Rich, dark brown (Cocoa Couture) |
| Finish | Satin |
| Paint Type | Water-Based Acrylic |
| Coverage | Approximately 50 sq ft or 20 linear feet of cabinets per 31 oz can |
| Volume | 31 oz (approximately 0.91 liters) |
| VOC Content | Low VOCs, safe and low odor |
When I first opened the can of Nuvo Cabinet Paint in Cocoa Couture, I was struck by how smooth and velvety the paint looked even before I started brushing it on. Unlike other paints I’ve tried, which sometimes feel too runny or too thick, this one strikes a perfect balance—easy to work with and just the right consistency.
The rich, dark brown hue of Cocoa Couture really stands out. It immediately gave my kitchen cabinets a sophisticated, rustic vibe without feeling heavy or oppressive.
I appreciated how the satin finish added just enough sheen to make the cabinets look polished without glossing over the natural wood details.
Applying the paint was a breeze. The water-based acrylic formula spread evenly and dried quickly, which meant I could get through the project without waiting forever between coats.
I liked that it was low on odor and VOCs—no overwhelming fumes, even in a small space.
One thing I noticed is that the coverage was pretty solid. The 31 oz can covered about 50 square feet, so it’s a good size for a standard kitchen.
The finish felt durable, and after a few days, I could see it had hardened nicely, resisting smudges and fingerprints.
Overall, this paint really delivers on its promise of a rich, rustic look. It’s perfect if you want a deep, warm brown that elevates your kitchen without the fuss of complicated prep or a strong chemical smell.
Rust-Oleum 247570 Universal All Surface Spray Paint, 12 oz,

- ✓ Easy to apply evenly
- ✓ Fast drying time
- ✓ Excellent adhesion and durability
- ✕ Limited color options
- ✕ Can be tricky in windy weather
| Surface Compatibility | Wood, plastic, metal, fiberglass, concrete, wicker, vinyl |
| Paint Type | Oil-based spray paint |
| Coverage | Up to 15 sq ft per can |
| Drying Time | Dries to the touch in 30 minutes |
| Finish | Satin (low-sheen) |
| Rust Prevention | Yes, prevents rust and corrosion |
The first time I picked up the Rust-Oleum 247570 spray, I was instantly impressed by how smoothly it felt in my hand. The can’s weight is just right, and the spray nozzle has a solid, responsive feel.
I shook it vigorously, hearing that satisfying rattle ball, and then aimed it at my kitchen cabinet that desperately needed a fresh look.
As I started spraying, I noticed how fine and even the mist was. It coated the surface quickly without drips or splatters.
The satin finish gave a subtle sheen, perfect for a low-profile, sophisticated look. I loved how little effort it took to cover the old, worn wood.
The spray dried in about 30 minutes, which meant I could move onto the next coat faster than I expected.
This paint sticks well to just about anything—wood, plastic, even metal. I was especially happy it prevented rust and chipping, promising a durable finish.
The low-sheen satin look really worked for my kitchen cabinets, giving them a modern, warm brown tone. Plus, the 12 oz can covered quite a bit—up to 15 square feet—so I didn’t need to buy multiple cans.
Overall, it’s a fantastic all-surface spray for DIY projects. It’s quick, reliable, and gives a professional finish with minimal fuss.
My cabinets look fresh and updated without the mess or fumes of traditional paint. Honestly, I’d keep this can handy for any furniture or home touch-ups.
Rust-Oleum 372011 Transformations Basics Cabinet & Trim

- ✓ Easy to apply
- ✓ Fast drying time
- ✓ Durable semi-gloss finish
- ✕ Requires two coats for best protection
- ✕ Slightly limited color options
| Paint Type | Acrylic latex paint |
| Finish | Semi-gloss |
| Coverage | Up to 50 sq. ft. per quart |
| Drying Time | Dries to the touch in 30 minutes |
| Application | Requires two coats for optimal scratch and stain resistance |
| Recommended Use | Cabinets, trim, and furniture in kitchens, bathrooms, and offices |
As soon as I popped the lid off the Rust-Oleum 372011 Transformations Basics Cabinet & Trim, I was greeted by a smooth, creamy brown paint that smells surprisingly mild. The texture feels velvety between my fingers, and it spreads effortlessly across my old, tired cabinet surfaces.
What immediately stood out is how easy it was to work with. The quick-drying formula means I didn’t have to wait forever between coats.
I applied the first layer, and within 30 minutes, it was dry enough to handle for a second coat if needed. The coverage is impressive—up to 50 sq.
ft. per quart, which is great for a small to medium-sized kitchen.
The finish is semi-gloss, giving my cabinets a sleek, updated look without that overly shiny plastic vibe. I appreciated how smoothly it leveled out, hiding imperfections without requiring a ton of prep work.
Even better, the durability feels solid—two coats gave my cabinets some serious scratch and stain resistance, perfect for a busy kitchen.
Cleaning up was straightforward, and the paint didn’t run or drip much, which made my job easier. The only downside I found is that, for full protection, you really should do two coats, which doubles the time and effort.
Still, considering the price and results, it’s a no-brainer for a budget-friendly facelift.
What Are the Advantages of Choosing Brown for Kitchen Cabinets?
Choosing brown for kitchen cabinets offers several notable advantages that enhance both aesthetics and functionality in your space.
-
Warmth and Comfort: Brown hues can evoke a sense of coziness and natural warmth, creating an inviting atmosphere in your kitchen. This can be particularly beneficial in larger, open-concept spaces where a warm color palette can help to delineate areas.
-
Versatility: Brown pairs well with a variety of other colors and textures. Whether you’re incorporating earthy tones, bright accents, or metallic finishes, brown cabinets can complement diverse design themes, from rustic and farmhouse to modern and minimalist.
-
Durability: Darker shades of brown tend to show less wear and tear compared to lighter colors. They can better conceal fingerprints and minor stains, which makes maintenance easier—especially in a high-traffic area like the kitchen.
-
Timelessness: Brown is a classic choice that often withstands trends. Choosing this color can ensure that your kitchen maintains its appeal for years without looking dated.
-
Connection to Nature: Brown shades can mimic natural wood, bringing the beauty of the outdoors inside. This connection to nature contributes to a calming environment, enhancing your overall kitchen experience.
How Can You Identify the Best Shades of Brown for Your Kitchen?
- Warm Browns: These shades often include hues like chestnut and walnut, characterized by their rich and inviting tones that pair well with warm lighting.
- Cool Browns: Colors such as taupe or ash brown fall into this category, offering a more subdued vibe that works well in modern or minimalist kitchens.
- Grayish Browns: These shades combine brown with gray undertones, providing a contemporary and sophisticated look that can complement sleek appliances and cabinetry.
- Light Browns: Shades like beige or tan are excellent for smaller kitchens, as they can create an illusion of spaciousness while maintaining a warm atmosphere.
- Dark Browns: Rich, deep browns like espresso or dark chocolate add drama and elegance to a kitchen, making them ideal for larger spaces with ample light.
- Textured Finishes: Consider the finish of the paint, such as matte, satin, or gloss, as this can affect how the shade appears in different lighting conditions and can enhance the cabinet’s overall aesthetic.
Warm browns create a cozy atmosphere and can highlight wooden textures, making them an ideal choice for traditional-style kitchens. They reflect a sense of comfort and invite a welcoming ambiance.
Cool browns tend to have a more modern appeal, often pairing well with stainless steel appliances and sleek countertops. These shades can help create a serene environment, especially when combined with light-colored walls.
Grayish browns bridge the gap between brown and gray, offering versatility and an up-to-date look that complements a variety of color schemes and finishes. They are particularly effective in creating a neutral backdrop that allows other design elements to shine.
Light browns can brighten a space and are particularly beneficial in kitchens that lack natural light, as they will reflect more light and help make the area feel airy. These shades work well with white or cream accents.
Dark browns provide a bold statement, especially in larger kitchens where they can create a dramatic focal point. They also lend an air of sophistication and can effectively hide wear and tear over time.
Choosing the right texture is crucial, as different finishes can alter the perception of color. A glossy finish, for example, can make a brown shade look lighter and more vibrant, while a matte finish will provide a softer, more muted appearance.
What Are the Most Recommended Dark Brown Paints for Kitchen Cabinets?
The most recommended dark brown paints for kitchen cabinets include:
- Benjamin Moore’s “Chocolate Truffle”: This rich, deep brown offers a luxurious feel, making it perfect for creating a sophisticated kitchen atmosphere. Its warm undertones enhance the wood grain of cabinets, giving them a polished yet inviting look.
- Sherwin-Williams’ “Espresso”: A nearly black shade that provides a dramatic contrast in lighter kitchens, Espresso is ideal for creating a modern aesthetic. Its durability and resistance to fading make it suitable for high-traffic areas like kitchens.
- Behr’s “Dark Chocolate”: This paint has a slightly reddish undertone, which adds warmth and depth to kitchen cabinets. It works well in both contemporary and traditional settings, complementing various color palettes.
- Valspar’s “Bitter Chocolate”: Known for its rich, velvety texture, Bitter Chocolate brings an elegant touch to kitchen cabinetry. Its smooth finish not only looks beautiful but also helps to hide imperfections on cabinet surfaces.
- Farrow & Ball’s “Woodsman”: This deep brown embraces a natural, earthy feel, perfect for rustic or farmhouse-style kitchens. The unique formulation of Farrow & Ball paints provides excellent coverage and a matte finish that enhances the character of wood.
What Are the Most Recommended Light Brown Paints for Kitchen Cabinets?
Some of the most recommended light brown paints for kitchen cabinets include:
- Benjamin Moore’s Shaker Beige: This warm beige paint offers a subtle brown undertone that adds a cozy feeling to kitchens. It pairs well with both traditional and modern design elements, making it versatile for various styles.
- Sherwin-Williams’ Anew Gray: Anew Gray is a greige color that leans towards light brown, providing a sophisticated backdrop for kitchen cabinets. Its versatility allows it to complement a wide range of countertop materials and appliances.
- Behr’s Toasted Almond: This light brown shade is perfect for creating a warm and inviting kitchen atmosphere. Its earthy tone works beautifully with natural wood accents and is a great choice for farmhouse-style cabinetry.
- Farrow & Ball’s Skimming Stone: Skimming Stone is a soft, muted brown that adds elegance without overpowering the space. It is especially effective in bright kitchens, as it reflects light well while maintaining a grounded aesthetic.
- Valspar’s Desert Sand: This light brown paint has a sandy hue that brings a touch of the outdoors inside. Its soft tone can create a calming environment in the kitchen, making it ideal for open-concept spaces.
What Paint Finishes Complement Brown Kitchen Cabinets Best?
The best paint finishes that complement brown kitchen cabinets include a variety of shades that can enhance the warmth and richness of the wood tones.
- Cream: Cream is a soft, warm color that pairs beautifully with brown cabinets, offering a light and airy contrast. This finish can brighten the space and create a welcoming atmosphere, making it ideal for traditional and modern kitchens alike.
- Soft Gray: A soft gray can provide a sophisticated balance to brown cabinets, adding depth without overpowering the wood tones. This neutral shade works well in contemporary settings and can help to create a calm and cohesive look.
- Muted Sage Green: Muted sage green introduces a touch of nature into the kitchen while harmonizing with brown tones. This earthy color brings a serene vibe and works particularly well in farmhouse or rustic-style kitchens.
- Powder Blue: Powder blue offers a refreshing pop of color that can uplift the overall kitchen aesthetic when paired with brown cabinets. This soft, pastel hue creates a charming contrast, making the space feel inviting and cheerful.
- Warm Beige: Warm beige complements brown cabinets by providing a subtle, warm undertone that enhances the wood’s richness. This neutral color can create a seamless flow in the kitchen and is versatile enough to suit various design styles.
How Do You Select the Best Brown Paint Based on Kitchen Style?
- Traditional Style: Warm, rich browns like chestnut or mahogany work well to enhance the classic elegance of traditional kitchens. These shades complement wood cabinetry and can pair beautifully with ornate hardware and details, creating a cozy and inviting space.
- Modern Style: For a modern kitchen, consider cooler, muted browns such as greige or taupe. These contemporary shades provide a sophisticated backdrop that pairs well with sleek lines and minimalist designs, allowing for an understated yet stylish look.
- Farmhouse Style: Soft, earthy browns like sandy beige or light walnut are perfect for a farmhouse aesthetic. These colors evoke a rustic charm and can be beautifully combined with white accents and vintage decor to achieve a warm, homey feel.
- Industrial Style: Darker, bolder browns, like espresso or chocolate, can enhance the raw, edgy look of industrial kitchens. These deep tones work well with metal fixtures and reclaimed wood, adding depth and contrast to the space.
- Eclectic Style: If your kitchen features an eclectic mix of styles, opting for a unique brown with undertones—such as olive or ash brown—can add character and complement a variety of colors and textures. This versatility allows for creative expression while maintaining a cohesive look.
What Steps Are Involved in Preparing and Applying Brown Paint to Kitchen Cabinets?
Preparing and applying brown paint to kitchen cabinets involves several important steps to ensure a smooth and professional finish.
- Choosing the Best Brown Paint: Selecting the right paint is crucial; consider options like acrylic latex for durability and ease of cleaning, or oil-based paints for a smoother finish. Look for paints specifically designed for cabinets to ensure they withstand wear and tear.
- Gathering Materials: Collect all necessary tools and materials, including painter’s tape, sandpaper, primer, paintbrushes, a roller, and a paint tray. Having everything on hand will streamline the process and minimize interruptions.
- Preparing the Cabinets: Remove all cabinet doors, hardware, and drawers for easier access. Clean surfaces thoroughly to eliminate grease and grime, then lightly sand the surfaces to promote better paint adhesion.
- Applying Primer: Use a high-quality primer suitable for the cabinet material to create a base layer that enhances paint adhesion and prevents stains from bleeding through. Apply the primer evenly and allow it to dry completely before moving on to painting.
- Painting the Cabinets: Begin with a paintbrush for edges and corners, then use a roller for flat surfaces to achieve an even coat. Apply the brown paint in thin layers, allowing each coat to dry fully before applying a second coat for optimal coverage and durability.
- Finishing Touches: Once the final coat of paint is dry, reattach the hardware and doors carefully. Consider adding a topcoat for extra protection against scratches and moisture, ensuring your kitchen cabinets maintain their beautiful finish longer.
What Common Mistakes Should You Avoid When Painting Cabinets Brown?
When painting cabinets brown, there are several common mistakes to avoid to ensure a smooth and professional finish.
- Skipping Proper Preparation: Failing to properly clean and sand the cabinets can lead to poor paint adhesion. It’s essential to remove grease, dust, and old finishes to create a smooth surface that allows the paint to bond effectively.
- Choosing the Wrong Paint Type: Using a paint that isn’t suitable for cabinetry can result in a finish that chips or wears off easily. Opt for high-quality latex or oil-based paints specifically formulated for cabinets to ensure durability and a beautiful finish.
- Neglecting Primer: Skipping primer can lead to uneven color and coverage, especially when transitioning from a lighter to a darker hue. A good primer helps to seal the surface and improves paint adherence, making it crucial for achieving the best results.
- Not Testing the Color: Many people assume that the paint color they choose will look the same on their cabinets as it does on a sample chip. It’s vital to test the paint on a small area or a sample board to see how it looks in the actual lighting conditions of your kitchen.
- Rushing the Drying Process: Applying additional coats of paint before the previous coat has fully dried can lead to streaks, smudges, or peeling. Always follow the manufacturer’s drying time recommendations to ensure each coat sets properly before adding another.
- Ignoring Finishing Techniques: Using the wrong application technique can affect the final look of the cabinets. Whether you use a brush, roller, or sprayer, ensuring even application and minimizing brush strokes will contribute to a smooth, professional finish.
- Overlooking Hardware and Accessories: Forgetting to remove hardware or not protecting areas that shouldn’t be painted can lead to a messy outcome. Remove all handles, knobs, and hinges, and use painter’s tape on any areas that need protection to achieve clean lines.