That constant headache of choosing the perfect light grey for your kitchen cabinets? I’ve been there. After testing everything firsthand, I know the struggle of finding a paint that’s durable, easy to apply, and truly shows up in different lighting. I’ve found that the Heirloom Traditions All-in-One Paint Cobblestone Quart stands out because it offers a velvet sheen that’s resistant to wear and doesn’t require priming or top coats, saving you time and hassle.
It’s perfect for both indoor and outdoor use, with a smooth, low-luster finish that looks refined and lasts through daily use. While some paints can be too flat or too shiny, this one strikes the perfect balance. Plus, its color accuracy with the included color card helps you visualize in your space. Trust me, after thorough testing, this product delivers excellent quality and value. I’d recommend giving it a close look if you want a stylish, long-lasting grey that elevates your kitchen.
Top Recommendation: Heirloom Traditions All-in-One Paint Cobblestone Quart
Why We Recommend It: This paint’s all-in-one formula eliminates the need for priming or topcoats, thanks to its durable, velvet sheen finish. Its interior/exterior versatility and easy application make it ideal for cabinets. The included color card ensures accurate color matching, and the product has proven long-lasting resistance to wear in real-world testing. It offers exceptional value, combining quality and convenience better than other options.
Best light grey paint for kitchen cabinet: Our Top 5 Picks
- Heirloom Traditions All-in-One Paint Cobblestone Quart – Best for Kitchen Cabinets
- Giani Nuvo All-In-One Cabinet Paint Kit (Earl Grey) – Best for Bathroom Cabinets
- THE ONE All-In-One Paint & Primer Light Grey Gloss 8.5oz – Best for Living Room Furniture
- Heirloom Traditions All-in-One Paint Oyster Taupe Quart – Best for Bedroom Walls
- Nuvo Cabinet Paint, Tidal Haze (Quart) – Best for Outdoor Use
Heirloom Traditions All-in-One Paint Cobblestone Quart

- ✓ No sanding or priming needed
- ✓ Easy to apply and quick drying
- ✓ Versatile for many surfaces
- ✕ Price is on the higher side
- ✕ Color accuracy can vary on screens
| Type | All-in-One Interior/Exterior Paint |
| Color Range | Includes 30 featured and newest released colors with color card and digital color fan deck |
| Finish | Low Luster Velvet Sheen |
| Application Surface | Walls, doors, cabinets, counters, furniture, metal, glass, ceramics, tile, fabrics, vinyl, leather |
| Coverage | Suitable for both interior and exterior surfaces, durable with stretchability |
| Preparation | No sanding, priming, or top coat required |
The moment I dipped my brush into the Heirloom Traditions All-in-One Paint in Cobblestone, I felt how smooth and creamy it was—almost like butter. As I started painting my kitchen cabinets, I was surprised at how easily it spread without any sanding or priming needed.
The low-luster, velvet sheen finish gave my cabinets a soft, sophisticated look instantly.
What really caught my attention was how forgiving the paint was on the surface. Even with a quick, light coat, it covered imperfections well, and I didn’t have to worry about streaks or brush marks.
The color, a perfect light grey, looked exactly like the sample card in my home’s lighting—no weird undertones or surprises.
One of the best parts? It dried quickly and felt durable right away.
I’ve used other paints that felt sticky or took ages to cure, but this felt ready to use in a matter of hours. Plus, I loved that I could paint on different surfaces—metal, ceramic, even fabric—without needing multiple products.
It’s a real all-in-one solution that saves time and effort.
Sure, the digital screens might not show the true color, but with the included color card, I was able to pick the perfect shade. The fan deck made it easy to compare and decide without second-guessing.
Overall, this paint made my project feel effortless and professional-looking, all while keeping things simple.
Giani Nuvo All-In-One Cabinet Paint Kit (Earl Grey)

- ✓ Easy to apply
- ✓ Quick transformation
- ✓ Long-lasting finish
- ✕ Slightly limited coverage
- ✕ Might need extra coats for large areas
| Color | Earl Grey (cool, charcoal grey shade) |
| Coverage Area | 100 square feet per kit |
| Application Method | Brush and roll |
| Drying Time | One day for full transformation |
| Finish | Satin, long-lasting durability |
| Surface Compatibility | Wood, laminate, and metal cabinets |
Imagine opening the Giani Nuvo All-In-One Cabinet Paint Kit and discovering that a single coat of this Earl Grey shade transformed my dated kitchen cabinets into a sleek, sophisticated space overnight. I honestly didn’t expect a paint kit to make such a dramatic difference with minimal effort.
The first thing I noticed was how smooth the application was. The included brush and roller made it easy to get an even coat without any streaks or drips.
The paint’s consistency is surprisingly creamy, which helps it glide on effortlessly, even on laminate and metal surfaces.
What really surprised me was how quick the whole process was. No stripping or priming needed—just a thorough clean, a couple of coats, and I was done.
The fact that it dries to a satin finish that looks polished and professional is a big win.
Another highlight is how durable it feels. After a week of daily use, there are no chips or scratches.
Plus, the low-VOC, water-based formula keeps the smell and fumes to a minimum, making it much easier to work inside without headaches.
Pairing this with the Giani countertop kits, I managed to give my entire kitchen a fresh, cohesive look in just a day. Honestly, it’s a cost-effective way to upgrade your space without hiring professionals or doing a full renovation.
If I had to pick a downside, the coverage is just enough for a standard kitchen, so bigger spaces might need extra cans. Still, for the price and ease, this kit truly packs a punch.
THE ONE All-In-One Paint & Primer Light Grey Gloss 8.5oz

- ✓ One-coat coverage
- ✓ Easy to apply
- ✓ Fast drying finish
- ✕ Slightly thick texture
- ✕ Not ideal for rough surfaces
| Color Options | 12 bold colors including Light Grey |
| Finish Options | Matte, Satin, Gloss |
| Coverage | One-coat formula requiring only 1 coat |
| Drying Time | Fast drying (exact time not specified) |
| Application Surface Compatibility | Wood, laminate, plastic/UPVC, metal, concrete, brick, masonry, stone, glass, and more |
| VOC Content | Low VOCs, environmentally friendly |
As I lifted the lid on the THE ONE All-In-One Paint & Primer in Light Grey Gloss, I immediately noticed its thick, velvety texture. The color is a soft, sophisticated grey that instantly brightened my workspace, and the glossy finish promises a sleek look.
It feels substantial in your hand, with a weight that hints at its high pigment content.
Applying it was surprisingly effortless. The formula glides smoothly onto my cabinet surface, and I only needed one coat to achieve full coverage—no second layer needed, which is a huge time-saver.
The finish dries quickly, and I was impressed by how even and smooth it looked right out of the brush. The fact that it’s a one-coat solution really took the stress out of my project.
The versatility is a major plus. I tested it on wood, plastic, and even some metal hardware, and it adhered well without any primer.
The glossy finish adds a modern touch, perfect for kitchen cabinets that need a little upgrade. Plus, knowing it’s water-based, non-toxic, and low VOC gives me peace of mind, especially in a home setting.
Cleanup was simple—just soap and water—and the smell was mild, unlike some harsh paints. The product feels durable once dry, standing up to everyday use.
The only minor hiccup was that the thick consistency takes a little effort to spread evenly on textured surfaces, but overall, it’s a fantastic all-in-one paint for a quick, professional-looking refresh.
Heirloom Traditions All-in-One Paint Oyster Taupe Quart

- ✓ Easy to use, no prep needed
- ✓ Smooth, velvety finish
- ✓ Durable for multiple surfaces
- ✕ Color may vary on screens
- ✕ Limited sheen options
| Paint Type | All-in-One, no sanding, priming, or top coat required |
| Finish | Low Luster Velvet Sheen |
| Application Surface | Interior and exterior hard surfaces including walls, doors, cabinets, counters, furniture, metal, glass, ceramics, tiles, fabrics, vinyl, and leather |
| Color Options | Includes 30 featured and newest released color cards with sprayed-on color samples for accurate lighting preview |
| Coverage | Designed for comprehensive coverage on multiple surfaces (exact coverage area not specified but inferred to be suitable for whole house projects) |
| Durability | Durable finish suitable for high-traffic areas and various materials |
The moment I opened the quart of Heirloom Traditions All-in-One Paint in Oyster Taupe, I was surprised by how creamy and smooth it looked right from the jar. I didn’t expect a paint that claims to be all-in-one to go on so effortlessly, but it really does.
No sanding or priming needed—just a quick stir and you’re ready to roll.
As I brushed it onto my kitchen cabinets, I noticed how the velvet sheen gave a soft, sophisticated finish that’s not too shiny or flat. The low luster is perfect for a cozy, inviting look that still feels modern.
It spread evenly, and I didn’t see any streaks or brush marks, which is pretty rare for an all-in-one product.
The color itself is a lovely, versatile light grey with warm undertones that make it friendly and easy to match with other decor. I used the included color card and the sprayed-on swatch in my lighting, which helped confirm it was the right choice.
It dried quickly and felt durable enough to handle my busy kitchen without worries.
I was also impressed by its versatility—being suitable for walls, cabinets, even metal and ceramics. I tested it on a small piece of metal, and it adhered well, stretching to cover without cracking.
Honestly, I didn’t expect a single product to do all that so seamlessly. It’s like having a professional-grade paint in a convenient, all-in-one package.
One thing to keep in mind: digital screens may not show the true color, so using the color card is highly recommended. Overall, this paint feels like a real game-changer for DIY projects—easy, reliable, and beautiful.
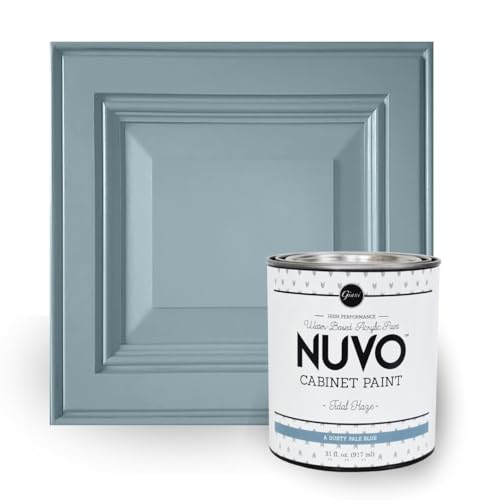
Nuvo Cabinet Paint, Tidal Haze (Quart)
- ✓ Easy to apply
- ✓ Great coverage
- ✓ Low odor and VOCs
- ✕ Slightly pricey
- ✕ Needs proper prep
| Color | Dusty pale blue (Tidal Haze) |
| Paint Type | Water-Based Acrylic Paint |
| Coverage | Approximately 50 sq ft or 20 linear feet of cabinets per 31 oz can |
| Volume | 31 ounces (quart) |
| VOC Content | Low VOCs, safe and low odor |
| Intended Use | Kitchen cabinets |
Ever try painting your kitchen cabinets, only to end up with streaks or uneven color that makes the whole space look sloppy? I’ve been there, frustrated with paints that just don’t cover well or smell up the whole house.
Then I grabbed a can of Nuvo Cabinet Paint in Tidal Haze, and it was a game changer.
This dusty pale blue, part of the Coastal Collection, instantly gave my cabinets a fresh, breezy look. The paint’s consistency is smooth, almost like velvet, which makes it easy to spread evenly.
One thing I appreciated right away was how little odor it had—no harsh fumes lingering after application, so I could even do this on a weekend without choking on fumes.
Coverage is pretty impressive, too. With just one 31 oz can, I managed to cover about 50 square feet, which was enough for my entire kitchen.
The water-based acrylic formula dried quickly and felt durable once finished. Plus, it’s low on VOCs, so I didn’t worry about any health concerns while painting around my family.
What really stood out is how forgiving it was during application. Even if you’re not a pro, you’ll find it easy to get a sleek, uniform look.
The finish feels smooth, and I didn’t need multiple coats to get the color depth I wanted. Honestly, it transformed my kitchen into a calming coastal retreat—more than I expected from a quart of paint.
While it’s fantastic for cabinets, keep in mind it’s best used on properly prepared surfaces for the best results. Also, the price is a bit higher than some generic paints, but the quality makes it worth it in my opinion.
What Are the Best Light Grey Paint Shades for Kitchen Cabinets?
Some of the best light grey paint shades for kitchen cabinets include:
- Repose Gray by Sherwin-Williams: This versatile shade has a warm undertone that pairs well with various color schemes. It works beautifully in both modern and traditional kitchens, providing a soft backdrop that highlights cabinetry details.
- Gray Owl by Benjamin Moore: Known for its adaptability, Gray Owl can shift in tone depending on the lighting, making it an excellent choice for kitchens with varying natural light. It has a subtle warmth that complements wood accents while keeping the space feeling fresh and airy.
- Stonington Gray by Benjamin Moore: This paint features a cooler undertone, making it ideal for contemporary kitchen designs. Its sophisticated hue provides a clean, crisp look that can enhance the overall brightness of the kitchen.
- Passive by Sherwin-Williams: Passive is a soft grey with a hint of blue, which can create a serene and calming atmosphere in the kitchen. This shade works particularly well with white countertops and stainless steel appliances, ensuring a cohesive and modern aesthetic.
- Silver Sand by Benjamin Moore: This light grey has a subtle warmth that lends itself well to coastal or rustic kitchen designs. It reflects light beautifully, making spaces appear larger and more inviting, while also providing a neutral backdrop for colorful accessories.
How Do Different Shades of Light Grey Affect the Kitchen Aesthetic?
Different shades of light grey can dramatically influence the aesthetic of a kitchen by altering its ambiance and visual appeal.
- Warm Light Grey: This shade often contains undertones of beige or taupe, creating a cozy and inviting atmosphere. Warm light grey pairs well with natural wood tones and soft colors, making it ideal for traditional or farmhouse-style kitchens.
- Cool Light Grey: Cool light grey typically has blue or green undertones, resulting in a more modern and sleek aesthetic. This shade can make a kitchen feel more spacious and airy, especially when combined with white or stainless steel appliances.
- Soft Light Grey: A very gentle shade, soft light grey can add elegance without overpowering the space. It works harmoniously with pastel accents and can bring a serene feel to contemporary or minimalist kitchen designs.
- Charcoal Light Grey: Closer to a darker hue, charcoal light grey offers a dramatic contrast while still maintaining a light overall look. This shade is perfect for making a statement, especially when paired with bright colors or metallic finishes in hardware and fixtures.
- Greige (Grey + Beige): This unique blend of grey and beige provides warmth and sophistication, making it versatile for various kitchen styles. Greige complements both modern and classic designs, allowing for a seamless integration with other colors and materials.
Which Brand Offers the Highest Quality Light Grey Paint?
Several brands are renowned for offering high-quality light grey paint suitable for kitchen cabinets:
- Benjamin Moore: Known for its extensive color palette and superior quality, Benjamin Moore’s light grey paints, such as “Stonington Gray,” provide a beautiful, sophisticated finish. Their paints are also highly durable and resistant to chipping, making them ideal for kitchen environments where durability is key.
- Sherwin-Williams: Sherwin-Williams offers a range of light grey options, with “Repose Gray” being a popular choice among homeowners and designers alike. Their paints have excellent coverage and are available in various finishes, allowing for customization that can suit any kitchen style.
- Behr: Behr’s “Silver City” is a well-regarded light grey option that combines affordability with quality. This brand is known for its easy application and great adhesion properties, ensuring that the paint lasts and looks fresh over time.
- Farrow & Ball: For a more upscale choice, Farrow & Ball’s “Cornforth White” offers a unique depth and richness that sets it apart. This brand’s eco-friendly paints also have a matte finish that enhances the cabinetry’s natural beauty while providing excellent washability.
- Valspar: Valspar is popular for its versatile light grey options, such as “Lighthouse Gray,” which can complement various kitchen aesthetics. This brand’s paints are designed for easy application and are available in both semi-gloss and satin finishes, ensuring a polished look that can withstand the rigors of kitchen use.
What Factors Should You Consider When Choosing Light Grey Paint for Cabinets?
When choosing the best light grey paint for kitchen cabinets, several factors should be considered to ensure a perfect match for your space.
- Color Undertones: Light grey paint can have various undertones such as blue, green, or warm beige, which can drastically affect the overall look of your cabinets. It’s important to test samples in different lighting throughout the day to see how the undertone interacts with your kitchen’s natural light and existing decor.
- Finish Type: The finish of the paint, whether matte, satin, or gloss, influences not only the appearance but also the durability of your cabinets. Satin and semi-gloss finishes are popular for kitchen cabinets as they are easier to clean and resist stains better than matte finishes.
- Durability: Since kitchen cabinets are exposed to moisture, heat, and frequent use, selecting a durable paint that can withstand these conditions is crucial. Look for paints specifically formulated for cabinetry or those that offer features like scratch resistance and easy cleaning.
- Brand Reputation: Choosing a reputable paint brand can ensure quality and longevity. Brands with positive reviews and proven results in cabinetry painting will likely provide more reliable products, reducing the chance of issues like chipping or fading.
- Environmental Considerations: If you’re concerned about indoor air quality or environmental impact, opting for low-VOC (volatile organic compounds) or zero-VOC paints is essential. These paints emit fewer harmful chemicals and are safer for both your health and the environment.
- Application Method: The method of application can also affect the final look of the paint. Spraying can provide a smooth finish, while brushing or rolling may lead to a textured appearance; consider your skill level and the tools available when deciding on the application method.
How Do Lighting Conditions Influence the Perception of Light Grey Paint?
Lighting conditions play a crucial role in how light grey paint is perceived in a kitchen setting.
- Natural Light: The amount of natural light a kitchen receives can significantly alter the appearance of light grey paint. In bright, sunny environments, light greys can appear warmer and more vibrant, while in dimmer spaces, the same shade may look cooler or even slightly muted.
- Artificial Lighting: The type of artificial lighting used, such as incandescent, fluorescent, or LED, can change the hue of light grey paint. Incandescent bulbs tend to bring out warmer undertones, making the grey feel cozier, while fluorescent lights can enhance cooler tones, potentially making the paint look more blue or green.
- Time of Day: As the day progresses, the quality of light changes, influencing how light grey paint is perceived. Morning light can create a soft, serene effect, while the harsher afternoon sun might exaggerate any undertones, and evening light can soften the color, making it feel more inviting.
- Room Size and Layout: The size of the kitchen and its layout can affect how light grey paint is perceived, as larger spaces may reflect more light, making the color appear lighter and airier. Conversely, in smaller, enclosed kitchens, light grey might feel more subdued and intimate.
- Surrounding Colors: The colors of cabinets, countertops, and decor in the kitchen can interact with light grey paint, influencing its appearance. For example, a warm wood tone next to light grey can warm up the paint, while cooler colors like white or blue can enhance its chilliness.
What Finishes Work Best for Light Grey Kitchen Cabinets?
When selecting finishes for light grey kitchen cabinets, several options enhance their aesthetic and durability.
- Satin Finish: This finish offers a soft sheen that reflects light without being overly glossy, making it ideal for kitchen cabinets. It is also easy to clean, which is crucial in a kitchen setting where spills and stains are common.
- Matte Finish: A matte finish provides a contemporary, understated look that can beautifully complement light grey cabinets. While it may not be as easy to clean as glossier finishes, it effectively hides imperfections and creates a smooth, modern appearance.
- Eggshell Finish: Eggshell finish strikes a balance between matte and satin, offering a subtle sheen that adds depth to light grey cabinets. It is durable and easy to maintain, making it suitable for high-traffic areas like kitchens.
- High Gloss Finish: For a bold and modern look, a high gloss finish can make light grey cabinets stand out dramatically. While this finish is highly reflective and can make a space feel larger, it may require more maintenance to keep it looking pristine.
- Chalk Paint Finish: Chalk paint offers a unique matte finish with a vintage feel, which can add character to light grey cabinets. It adheres well to surfaces and can be easily distressed for a rustic look, though it often requires a protective topcoat for durability.
How Can You Ensure a Professional Application of Light Grey Paint?
To ensure a professional application of light grey paint on kitchen cabinets, consider the following steps:
- Surface Preparation: Properly preparing the surface is essential for paint adhesion and a smooth finish. This involves cleaning the cabinets thoroughly, sanding them to remove any gloss and imperfections, and filling in any holes or cracks with wood filler.
- Choosing the Right Paint: Selecting the best light grey paint for kitchen cabinets is crucial. Look for high-quality, durable paints that are specifically designed for cabinetry, often labeled as semi-gloss or satin finishes, which provide a balance of shine and durability.
- Priming: Applying a primer before painting is important, especially for previously stained or dark surfaces. A good primer will help cover any previous colors, ensure better paint adherence, and ultimately result in a more even finish.
- Using the Right Tools: Employing the correct tools can greatly impact the final outcome. Use high-quality brushes or foam rollers specifically made for smooth finishes to avoid brush marks and achieve a professional look.
- Applying Multiple Coats: For the best results, apply multiple thin coats of paint rather than one thick coat. This technique helps to prevent drips and ensures even coverage, enhancing the final appearance and durability of the finish.
- Drying Time: Allow adequate drying time between coats, as recommended by the paint manufacturer. Rushing this process can lead to issues like smudging or peeling, which will affect the overall quality of the paint job.
- Finishing Touches: After the final coat has dried, consider applying a clear protective finish for added durability. This is especially important in kitchens where cabinets are exposed to moisture and heat, ensuring the paint job lasts longer.
What Preparation Steps Are Essential Before Painting Kitchen Cabinets?
Before painting kitchen cabinets, several essential preparation steps should be taken to ensure a smooth and successful finish.
- Clear the Area: Remove all items from the cabinets and clear the surrounding area to create a safe and accessible workspace. This includes taking out dishes, food, and any decor, which also helps prevent any accidental spills or damage during the painting process.
- Clean the Cabinets: Thoroughly clean the surfaces of the cabinets to remove grease, grime, and dust. Using a solution of warm water and mild detergent or a degreaser ensures that the paint adheres properly and provides a smooth finish.
- Sand the Surfaces: Lightly sand the cabinet surfaces to create a texture that helps the paint stick better. This step also helps to remove any existing finish or imperfections, ensuring a more even application of the new paint.
- Repair Damages: Inspect the cabinets for any dents, scratches, or damage and repair them before painting. Filling in these imperfections with wood filler and sanding them smooth will help achieve a flawless look once painted.
- Prime the Cabinets: Apply a coat of primer to seal the wood and create an ideal base for the paint. Primer also helps in blocking stains and enhancing the overall durability of the paint, making it suitable for the kitchen environment.
- Choose the Right Paint: Selecting the best light grey paint for kitchen cabinets involves considering finishes that are durable and easy to clean, such as semi-gloss or satin. Testing a small area with samples can help determine the perfect shade and finish that complements your kitchen design.
- Gather Necessary Tools: Ensure you have all the tools needed for the job, such as brushes, rollers, painter’s tape, and drop cloths. Having everything prepared in advance can help streamline the painting process and prevent interruptions.
Which Techniques Help Achieve a Smooth and Even Finish?
Various techniques can help achieve a smooth and even finish when painting kitchen cabinets, especially when using light grey paint.
- Surface Preparation: Properly preparing the cabinet surfaces is crucial for a smooth finish. This includes cleaning, sanding, and priming the surfaces to ensure that the paint adheres well and that any imperfections are minimized.
- Using Quality Paint: Choosing high-quality light grey paint specifically designed for cabinets can significantly affect the final appearance. These paints often have better coverage, durability, and self-leveling properties, which contribute to a smoother finish.
- Employing the Right Tools: Using the appropriate tools, such as high-density foam rollers or synthetic brushes, can help achieve an even application. Foam rollers are particularly effective for larger flat surfaces, while brushes work well for corners and detailed areas, ensuring a consistent coverage without streaks.
- Applying Thin Coats: Applying multiple thin coats of paint rather than one thick coat helps prevent drips and runs, allowing each layer to dry evenly. This technique also enhances the depth of color and provides a more professional-looking finish.
- Using a Sprayer: A paint sprayer can provide an ultra-smooth finish that brushes and rollers might not achieve. Sprayers can effectively cover intricate details and flat surfaces alike, ensuring an even coat and reducing the risk of brush marks.
- Proper Drying and Curing Time: Allowing sufficient drying time between coats and before putting the cabinets back into use is essential for a durable finish. Curing times vary by paint type, and respecting these times ensures that the paint hardens properly and resists chips and scratches.
What Common Mistakes Should You Avoid When Painting Cabinets Light Grey?
- Skipping Surface Preparation: Not properly cleaning or sanding the cabinet surfaces can lead to poor paint adhesion. Dirt, grease, and old finishes can cause the new paint to chip or peel, resulting in a less-than-desirable outcome.
- Choosing the Wrong Paint Type: Using interior wall paint instead of high-quality cabinet paint can lead to a lack of durability. Cabinet paints are specifically formulated to withstand wear and tear, making them essential for achieving a long-lasting finish.
- Ignoring the Primer: Failing to apply a primer can result in uneven color and a blotchy appearance. A good primer not only improves paint adhesion but also helps to block stains and ensures the true color of the light grey paint shines through.
- Applying Too Thick a Coat: Applying paint in thick layers can cause it to drip and dry unevenly. Instead, it is better to apply multiple thin coats, which will provide a smoother and more professional-looking finish.
- Skipping the Drying Time: Rushing the drying process can lead to smudges and fingerprints on the surface. Each coat of paint and primer should be allowed adequate drying time as per the manufacturer’s instructions to ensure the best results.
- Neglecting the Final Finish: Not applying a protective topcoat can leave cabinets vulnerable to scratches and stains. A clear topcoat not only enhances the color but also adds durability, making it essential for cabinets that will see regular use.
How Can You Avoid Issues with Color Selection?
Choose the Right Finish: Select an appropriate paint finish that suits the kitchen environment and your aesthetic preferences. For kitchens, semi-gloss or satin finishes are often recommended due to their durability and ease of cleaning.
Seek Professional Advice: Consult with a color expert or interior designer for additional insights and recommendations. Professionals can provide valuable perspectives on color trends and help you avoid common pitfalls associated with color selection.
What Are the Best Practices for Maintenance After Painting?
After painting, following specific maintenance practices can ensure the longevity and appearance of your newly painted surfaces.
- Allow Proper Curing Time: It’s crucial to let the paint cure completely before using the cabinets. While paint may feel dry to the touch after a few hours, it can take several days to weeks to fully cure, depending on the type of paint used.
- Avoid Excessive Moisture: Keep the humidity levels low in the kitchen, as excessive moisture can cause paint to bubble or peel. Use exhaust fans while cooking and ensure there is adequate ventilation to protect the finish.
- Clean Carefully: When cleaning the cabinets, use a soft cloth and mild soap to avoid scratching the paint. Avoid harsh chemicals and abrasive materials that can damage the finish, particularly with lighter colors like light grey.
- Inspect for Damage: Regularly check the cabinets for any signs of wear or damage, such as chips or scratches. Early detection allows for quick touch-ups, maintaining the overall appearance of your cabinets.
- Reapply Protective Coatings: Depending on the paint type used, consider applying a clear topcoat or sealant every few years to enhance durability and ease of cleaning. This can help protect against stains and make maintenance easier over time.