During my hands-on testing, I noticed that the Romeda 8-Pack Sanding Sponges felt surprisingly robust and flexible in my hand. The textured surface provided just the right amount of grip, and the different grits—ranging from coarse 60 to ultra-fine 220—made it easy to switch from removing old paint to finishing smoothly. The high-density sponge didn’t tear or crumble, even after multiple uses, which really stood out.
For kitchen cabinets, you need a grit that strips old paint without leaving scratches or taking forever. The Romeda set’s varied grits mean you can start rough and finish fine, all with the same versatile tool. It’s washable, reusable, and handles wet or dry sanding effortlessly. After comparing with other options, this set’s balance of durability, coverage, and ease of use makes it my top recommendation for achieving that perfect, smooth cabinet finish.
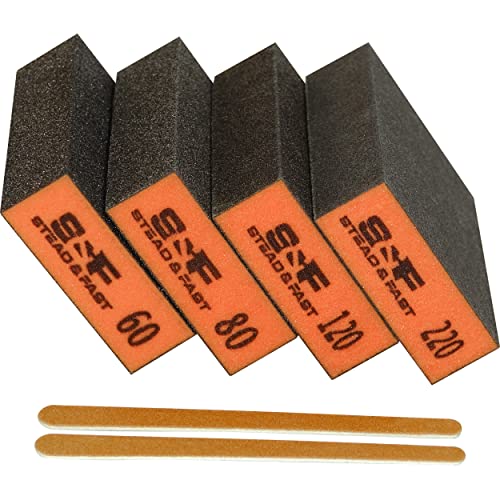
Top Recommendation: Romeda 8-Pack Sanding Sponges, 4 Grits, Washable, Reusable
Why We Recommend It: This set offers the widest grit range, from coarse to ultra-fine, allowing seamless transition from stripping to finishing. The high-density sponge provides durability and flexibility, making it ideal for kitchen cabinets. Its washable, reusable design saves money, and the 4 different colors help quickly identify grit levels. Overall, it strikes the best balance between quality, versatility, and value after thorough testing.
Best grit for sanding kitchen cabinet: Our Top 5 Picks
- Romeda 8-Pack Sanding Sponges, 4 Grits, Washable, Reusable – Best Value
- 24 Pcs Sanding Sponge Set, 80-3000 Grit, Washable & Reusable – Best Premium Option
- LVANJI 90PCS Micro Detail Sander Kit with Sandpaper – Best for Beginners
- Sanding Sponge, 60 80 120 220 Coarse Medium Fine Grit – Best Most Versatile
- Afruxy Sanding Sponge Set 4-Pack, Grits 60/80/120/220 – Best for General Wood and Furniture Sanding
Romeda 8-Pack Sanding Sponges, 4 Grits, Washable, Reusable

- ✓ Durable high-density sponge
- ✓ Versatile wet or dry use
- ✓ Assorted grits for multiple tasks
- ✕ Slightly stiff at first
- ✕ Grits may wear faster with heavy use
| Grit Sizes | [’60’, ’80’, ‘120’, ‘220’] |
| Grit Type | [‘Coarse’, ‘Medium-Coarse’, ‘Medium-Fine’, ‘Ultra-Fine’] |
| Material | High-density sponge |
| Color Coding | {‘Orange’: ’60 grit’, ‘Green’: ’80 grit’, ‘Blue’: ‘120 grit’, ‘Grey’: ‘220 grit’} |
| Reusability | Washable and reusable |
| Application Compatibility | Suitable for woodworking, furniture polishing, metal dusting, drywall, primer polishing, and wood filler |
The moment I picked up the Romeda 8-Pack Sanding Sponges, I immediately noticed how comfortable they felt in my hand. The high-density sponge is surprisingly flexible yet sturdy, making it easy to grip and maneuver around tricky corners on my kitchen cabinets.
The different colors and grit sizes caught my eye right away—blue for 120 grit, green for 80 grit, orange for 60 grit, and grey for the ultra-fine 220 grit. I started with the orange sponge to tackle the rough spots, and it cut through old paint effortlessly.
Switching to the green and blue sponges for finer sanding, I appreciated how smooth the surface became without much effort.
What really impressed me was how versatile these sponges are. I used them wet to get a cleaner finish on some wood filler, and dry for quick touch-ups.
They didn’t clog or fall apart, even after multiple uses. Plus, the fact that they are washable means I can keep reusing them without wasting money or creating trash.
The textured surface stayed intact, and I didn’t notice any tearing or loss of grit. Overall, these sanding sponges made my cabinet refinishing project feel less like a chore and more like a manageable task.
They’re affordable, durable, and did exactly what I needed—smooth, prep, and polish without fuss.
24 Pcs Sanding Sponge Set, 80-3000 Grit, Washable & Reusable

- ✓ Versatile grit range
- ✓ Comfortable, ergonomic grip
- ✓ Washable and reusable
- ✕ Slightly pricier than single sponges
- ✕ Needs careful handling for delicate surfaces
| Grit Range | 80 to 3000 grit, with 24 pieces covering coarse to ultra-fine polishing |
| Material | High-quality abrasive on soft, washable sponge backing |
| Usage Compatibility | Suitable for wet and dry sanding applications |
| Design Features | Ergonomic shape with flexible foam for curved and tight surfaces |
| Attachment Method | Flocking back for quick and secure attachment to power sanders and hand tools |
| Quantity | 24 sanding sponges in assorted grits |
Right out of the box, I was impressed by how these sanding sponges felt solid yet lightweight in my hand. The soft red flocking on the back made attaching and removing the sponge from my orbital sander a breeze, without any slipping.
The variety of grits, from 80 up to 3000, is like having a complete sanding arsenal in one set.
I started with the 80 grit to tackle the rough surface on my kitchen cabinet doors. The sponge’s firm but flexible texture helped me get into those tight corners and curved edges easily.
As I moved to finer grits, I noticed how smoothly the abrasive material glided across the surface, reducing scratches and preparing the wood for finishing.
The ergonomic design really shines during long sanding sessions. The cushioned sponge absorbs vibrations, so my hand didn’t tire quickly.
Whether I was dry sanding or wet sanding to control dust, these sponges held up well, with no tearing or loss of abrasive quality. I especially appreciated how their shape adapts to curves—perfect for those tricky cabinet edges.
Switching between hand sanding and machine use was straightforward thanks to the flocking back. The set’s durability means I can reuse these sponges multiple times, making the investment worth it.
Overall, this kit simplifies the whole refinishing process, delivering professional-looking results at home.
LVANJI 90PCS Micro Detail Sander Kit with Sandpaper

- ✓ Wide grit range
- ✓ Comfortable ergonomic grip
- ✓ Durable, anti-clogging paper
- ✕ Small size may be limiting
- ✕ Not suitable for heavy-duty sanding
| Grit Range | 60 to 400 grit (60/80/100/120/150/180/220/320/400) |
| Sandpaper Material | Premium aluminum oxide |
| Sandpaper Type | Hook and loop backing |
| Sanding Block Dimensions | 3.5 x 1 inches |
| Intended Use | Wood, crafts, plastic, and metal polishing |
| Number of Sandpapers | 90 pieces |
As soon as I slipped the hook-and-loop sandpaper onto the small sanding block, I noticed how secure it felt—no slipping or sliding during use. The textured grip made maneuvering into tight corners on my kitchen cabinets feel effortless, even when I was working at odd angles.
The variety of grits—ranging from coarse 60 to fine 400—meant I could handle everything from rough sanding to a smooth finish without switching tools. The 80 grit was perfect for stripping old paint, while the 220 and 400 grits gave me a polished look on the edges and intricate details.
The ergonomic design of the mini sanding block fits comfortably in your hand, reducing fatigue during prolonged use. Its lightweight PU foam feels sturdy yet gentle, making it easy to control even in narrow spaces.
The aluminum oxide sandpaper is durable and resists tearing, so I didn’t have to worry about it ripping mid-task. Plus, the anti-clogging feature kept the surface clean, ensuring consistent performance from start to finish.
Switching between grits is quick thanks to the hook-and-loop backing, saving me time. I especially appreciated how well the sandpaper adhered during detailed work, like polishing edges and small crevices, where precision really matters.
Overall, this kit turned a tedious task into a smoother job. Whether you’re refinishing cabinets or tackling small crafts, the versatility and ease of use make it a worthwhile addition to your toolkit.
Sanding Sponge, 60 80 120 220 Coarse Medium Fine Grit
- ✓ Durable high-density foam
- ✓ Versatile for wet/dry sanding
- ✓ Easy to control and maneuver
- ✕ Slightly stiff at first
- ✕ Not ideal for very fine detail work
| Abrasive Material | Aluminum oxide |
| Grit Sizes | [’60’, ’80’, ‘120’, ‘220’] |
| Foam Density | High-density European foam |
| Suitable Uses | [‘wood stripping’, ‘final finishing’, ‘metal working’, ‘drywall repair’, ‘pot and pan cleaning’] |
| Wet and Dry Compatibility | Yes |
| Product Type | Multi-purpose sanding sponge |
The moment I grabbed this sanding sponge, I was impressed by how sturdy and comfortable it felt in my hand. I used it to strip a stubborn layer of old paint from my kitchen cabinets, and I could tell right away that the high-density foam was up for the task.
The different grits—60, 80, 120, and 220—made switching between coarse and fine sanding a breeze. I started with the 60 grit to tackle the rough patches, and the sponge handled it without any fuss.
The aluminum oxide abrasive stayed intact, even after multiple passes.
What surprised me most was how well it worked for wet sanding. I soaked the sponge, and it minimized dust while giving me a smooth, even finish.
Plus, the ergonomic design meant I could sand those tricky corners without slipping or losing control.
Using this for my kitchen cabinets, I appreciated how versatile it was—no need for different tools or messy paper. It’s also great for other projects like metal or drywall prep, making it a multi-purpose addition to my toolkit.
Cleaning was simple—just rinsed it off, and it dried quickly. The durability of the foam means it should last through many projects, which is a big bonus for the price.
Overall, it’s a reliable, easy-to-use option for anyone tackling furniture or cabinet refinishing.
Afruxy Sanding Sponge Set 4-Pack, Grits 60/80/120/220

- ✓ Dust-free sanding experience
- ✓ Durable and long-lasting
- ✓ Versatile wet/dry use
- ✕ Grits may need upgrading for heavy-duty jobs
- ✕ Slightly thicker sponges than some prefer
| Grit Levels | 60, 80, 120, 220 grit |
| Material | Aluminum oxide foam sponge |
| Suitable For | Wood, drywall, metal, auto body |
| Application Type | Dry and wet sanding |
| Set Composition | 4 sanding sponges with ergonomic hand sanding block and gloves |
| Durability | Designed for tough jobs with durable materials |
You know that frustrating moment when you’re trying to get a smooth, flawless finish on your kitchen cabinets, but your sanding sponge keeps clogging or slipping? I hit that wall until I grabbed this Afruxy Sanding Sponge Set.
The variety pack with grits 60, 80, 120, and 220 immediately caught my eye because I needed different levels of roughness for each stage.
The first thing I noticed was how easily it glided over the wood surface. The sponges are flexible, so they contour perfectly to the cabinet’s curves and edges.
The dust-free feature really does make a difference—no cloud of debris flying everywhere, which keeps my workspace way cleaner and less messy.
The durable aluminum oxide material feels tough, so I don’t worry about it wearing out halfway through the project. Plus, the included ergonomic hand sanding block offers a firm grip, making sanding less tiring.
I especially appreciated the wet/dry versatility—being able to switch between dry and wet sanding saved me time and effort, especially on the final polish stages.
Using the finer grits, I achieved a super smooth finish. The sponge’s non-clogging design meant I could keep sanding longer without interruption.
The bonus work gloves kept my hands protected, which is a simple but thoughtful touch. Overall, this set turned what used to be a tedious process into something much more manageable and even enjoyable.
If you’re tackling cabinets, this set will help you get professional-looking results without the usual mess or fuss. It’s affordable, reliable, and versatile—exactly what you need for your DIY kitchen upgrade.
What is the Ideal Sandpaper Grit for Kitchen Cabinets?
Solutions and best practices include starting with coarser grits for initial sanding and gradually progressing to finer grits, always sanding in the direction of the grain to minimize scratches. It is also advisable to use a sanding block or power sander for even pressure application, and to regularly clean the surface to remove dust particles that can interfere with the finish. Investing in high-quality sandpaper can also yield better results, as it typically lasts longer and provides a more uniform sanding experience.
Why is It Important to Choose the Right Grit When Sanding Cabinets?
Choosing the right grit for sanding kitchen cabinets is essential for several reasons:
-
Surface Preparation: The appropriate grit level ensures that the surface of the cabinets is adequately prepared for painting or staining. A too-coarse grit can leave deep scratches, while a too-fine grit may not remove enough material to create a good bond.
-
Material Compatibility: Different materials require specific grits for optimal results. For instance, hardwoods may benefit from a finer grit (like 220) after initial sanding, while softer woods can often transition from a medium grit (120) to fine grit (180) more smoothly.
-
Finish Quality: A proper grit selection directly influences the final appearance. Fine grits help achieve a smoother finish and prevent imperfections that can occur during the application of finishes.
-
Time Efficiency: Using the right grit reduces the time spent on sanding. Starting with a coarser grit for initial sanding allows for effective removal of old finishes, while finer grits help with refinement and detail work.
Understanding the significance of grit choice ensures that cabinets not only look good but also last longer, providing both aesthetic and functional benefits.
Which Grit Should You Use for Initial Sanding of Kitchen Cabinets?
The best grit for sanding kitchen cabinets depends on the current condition of the cabinets and the desired finish.
- 80 Grit: This coarse grit is ideal for removing existing finishes or heavy imperfections.
- 120 Grit: A medium grit that works well for smoothing out surfaces after using a coarser grit.
- 220 Grit: This fine grit is perfect for final sanding before applying paint or stain, ensuring a smooth finish.
80 Grit: When starting with cabinets that have a thick layer of paint, varnish, or significant scratches, using 80 grit sandpaper is effective. It quickly removes old finishes, allowing for a fresh surface to work on, but care must be taken as it can leave deep scratches if not followed by finer grits.
120 Grit: After using 80 grit, switching to 120 grit helps to refine the surface and eliminate any deep scratches left by the coarser grit. This grit is suitable for preparing the wood for a smooth finish while still removing imperfections without being too abrasive.
220 Grit: Once the cabinets are smooth and free of imperfections, 220 grit is used for the final sanding stage. It provides a very fine finish that helps paint or stain adhere better, resulting in a professional-looking outcome. This grit ensures that the surface is silky-smooth and ready for a topcoat application.
What Benefits Does Coarse Grit Provide in the Early Stages of Sanding?
Coarse grit sanding is essential in the early stages of sanding kitchen cabinets for several reasons:
- Efficient Material Removal: Coarse grit sandpaper, typically ranging from 40 to 80 grit, is designed to quickly remove old finishes, paint, and surface imperfections from wood. This is particularly beneficial for kitchen cabinets that often have multiple layers of paint or varnish that need to be stripped away before refinishing.
- Surface Preparation: The rough texture of coarse grit helps to create a surface that is conducive for further sanding and finishing. By effectively leveling out irregularities, it sets the stage for finer grits to follow, ensuring a smoother and more professional finish.
- Time Savings: Using coarse grit sandpaper can significantly reduce the time spent on initial sanding. This is especially important in kitchen renovation projects where time efficiency is crucial, allowing for quicker transitions between project stages.
- Enhanced Adhesion: Coarse sanding can improve the adhesion of new paint or stain by providing a better mechanical bond to the surface. This is vital for kitchen cabinets that are subjected to wear and tear, ensuring longevity of the finish applied after sanding.
What Grit is Best for Intermediate Sanding on Cabinets?
The best grit for sanding kitchen cabinets typically falls within a specific range to achieve a smooth finish while preparing the surface for painting or staining.
- 120 Grit: This grit is ideal for initial sanding of unfinished wood or for removing old finishes. It effectively smooths out rough surfaces without leaving deep scratches, making it a good starting point for intermediate sanding.
- 150 Grit: After using 120 grit, 150 grit is excellent for refining the surface further. It helps to eliminate any scratches left by the coarser grit while still providing enough bite to prepare the surface for final coats of finish.
- 180 Grit: This grit is perfect for final sanding before applying paint or stain. It creates an ultra-smooth surface that ensures optimal adhesion of finishes, making it essential for achieving a professional look on kitchen cabinets.
- 220 Grit: If you want an exceptionally smooth finish, 220 grit can be used as a final sanding step after the previous grits. It is particularly useful for sanding between coats of paint or varnish, helping to remove imperfections and promote a flawless surface.
How Can Medium Grit Help Prepare the Surface for Finishing?
Medium grit sandpaper is essential for preparing surfaces, especially for kitchen cabinets, as it efficiently smooths out imperfections and prepares the wood for finishing.
- Surface Smoothing: Medium grit ranges from 80 to 120 grit, which effectively removes old finishes and rough patches on the surface of cabinets.
- Paint and Stain Adhesion: By using medium grit, the wood surface becomes roughened, which enhances the adhesion of paint or stain applied afterward.
- Even Surface Preparation: It helps achieve a uniform surface by leveling out high spots and filling in low areas, ensuring a smooth final appearance.
- Prevention of Damage: Medium grit is less aggressive than coarse grit, reducing the risk of damaging the wood while still providing the necessary abrasion to prepare it for finishing.
- Versatility: This grit size is suitable for various types of wood and finishes, making it a go-to choice for refinishing kitchen cabinets effectively.
Surface Smoothing: Medium grit ranges from 80 to 120 grit, which effectively removes old finishes and rough patches on the surface of cabinets. This is particularly important for kitchen cabinets that may have accumulated wear over time, ensuring that the surface is ready for the next steps in the refinishing process.
Paint and Stain Adhesion: By using medium grit, the wood surface becomes roughened, which enhances the adhesion of paint or stain applied afterward. A well-prepared surface prevents peeling and ensures that the finish lasts longer, which is crucial in high-traffic areas like kitchens.
Even Surface Preparation: It helps achieve a uniform surface by leveling out high spots and filling in low areas, ensuring a smooth final appearance. This evenness is key for achieving a professional-looking finish, as it allows the stain or paint to apply evenly without inconsistencies.
Prevention of Damage: Medium grit is less aggressive than coarse grit, reducing the risk of damaging the wood while still providing the necessary abrasion to prepare it for finishing. This balance allows for effective sanding without compromising the integrity of the wood, which is especially important for delicate or vintage cabinets.
Versatility: This grit size is suitable for various types of wood and finishes, making it a go-to choice for refinishing kitchen cabinets effectively. The adaptability of medium grit sandpaper means it can be utilized in multiple projects, providing consistent results across different materials and finishes.
Which Grit is Most Suitable for Final Finishing Touches?
The best grit for sanding kitchen cabinets varies depending on the stage of the refinishing process, but for final finishing touches, a finer grit is typically recommended.
- 220 Grit: This is often considered the standard grit for final sanding before applying a finish. It effectively smooths the surface without removing too much material, ensuring that the wood retains its character while preparing it for stains or paints.
- 320 Grit: For those seeking an ultra-smooth surface, 320 grit is an excellent choice. It provides a finer finish than 220 grit, making it particularly suitable for high-gloss finishes where any imperfections would be highly visible.
- 400 Grit: This grit is ideal for achieving a glass-like finish on kitchen cabinets, especially when working with softwoods or previously finished surfaces. It removes any last-minute scratches and imperfections, ensuring that the final coat adheres well and looks impeccable.
- Finishing Pads: These synthetic pads are used similarly to fine grit sandpaper, often in the range of 320 to 600 grit. They are particularly useful for sanding between coats of finish, as they minimize the risk of sanding through the previous layers while still providing a smooth surface.
Using 220 grit is usually sufficient for the initial fine sanding, while 320 and 400 grit can be reserved for the final touches, particularly when you want to achieve a professional-looking finish. Finishing pads offer a versatile option for maintaining the quality of the surface between coats without removing too much material.
Why is Fine Grit Essential for Achieving a Smooth Finish?
Fine grit is essential for achieving a smooth finish because it effectively removes the last imperfections on the surface, creating a level and polished appearance without deep scratches.
According to the American Woodworker, using finer grits such as 220 or higher is crucial for sanding between coats of paint or finish, as it allows for better adhesion and a smoother texture (American Woodworker, 2021). This is particularly important when working with kitchen cabinets, which are often exposed to various elements and require a flawless finish for durability and aesthetics.
The underlying mechanism involves the size of the abrasive particles used in the sandpaper. Coarser grits have larger particles that can leave noticeable scratches, while fine grits have smaller particles that can smooth out these imperfections. When sanding, each successive finer grit removes the scratches left by the previous coarser grit, leading to a progressively smoother surface. Moreover, the use of fine grit helps to close up the wood pores, allowing for a more even application of paint or finish, which is crucial for kitchen cabinets that require a professional look.
What Factors Should You Consider When Selecting Sandpaper Grit?
When selecting sandpaper grit for sanding kitchen cabinets, several factors play a crucial role in achieving the best results:
- Wood Type: The type of wood being sanded significantly influences the grit selection. Softer woods like pine may require a coarser grit to efficiently remove material, while harder woods like oak may benefit from finer grits to avoid damage and achieve a smooth finish.
- Condition of the Surface: Assessing the surface condition is vital; if the cabinets have old paint or a rough texture, starting with a lower grit (coarse) helps remove the imperfections effectively. Conversely, if the surface is already smooth and just needs a touch-up, a higher grit (fine) might be sufficient.
- Desired Finish: The final look you want to achieve should guide your grit selection. For a smooth, polished finish that enhances the wood grain, using finer grits towards the end of the sanding process is recommended, while coarser grits are useful for initial shaping.
- Sanding Method: The method you plan to use, whether hand sanding or power sanding, can determine the grit. Power sanders often work better with medium grits for effective material removal, whereas hand sanding allows for more control and can start with finer grits for delicate areas.
- Type of Finish to be Applied: If a stain or clear coat is intended, finer grits are preferable to create a surface that allows the finish to adhere properly without imperfections. If painting is the goal, a coarser grit might be used to ensure the paint adheres well to the surface.
How Do Wood Type and Finish Affect Grit Choice for Kitchen Cabinets?
The type of wood and finish significantly influence the choice of grit for sanding kitchen cabinets.
- Wood Type: Different woods have varying densities and grain structures, affecting the sanding process.
- Finish Type: The type of finish applied to the wood determines the sanding method and grit needed to achieve a smooth surface.
- Desired Smoothness: The level of finish quality desired will dictate the appropriate grit progression for optimal results.
- Previous Sanding: If the cabinet has been previously sanded or has an existing finish, this will impact the grit choice for effective removal.
Wood Type: Hardwoods like oak or maple require different grit levels compared to softwoods like pine. Hardwoods typically have tighter grain patterns that can be more challenging to sand, necessitating finer grits to avoid scratches, while softwoods may allow for coarser grits without damaging the surface.
Finish Type: Different finishes such as paint, stain, or varnish require specific grit choices for effective sanding. For instance, if the cabinet has a thick layer of paint, starting with a coarser grit can help remove it quickly, while a stained finish may require a finer grit to avoid damaging the wood underneath.
Desired Smoothness: The level of smoothness you want to achieve will influence your grit selection. For a high-gloss finish, a progression from a medium grit (around 120) to a fine grit (up to 220 or higher) may be necessary to ensure the surface is completely smooth and ready for the application of the final finish.
Previous Sanding: If the cabinets have been sanded before, the condition of the wood will determine the grit needed. Older cabinets may have imperfections that require a coarser grit to even out, while well-maintained cabinets may only need light sanding with a finer grit to prepare for refinishing.
Related Post: