Many users assume that any pizza stone will do for brick oven baking, but after extensive testing, I’ve found that not all stones distribute heat evenly or absorb moisture equally. My experience shows that the key is a high-quality material like Cordierite, which can handle high temperatures and create that perfect crispy crust without sogginess. For instance, the Unicook Cordierite Pizza Stone 15×12″ proved to deliver consistently crisp, evenly cooked pizzas, thanks to its excellent heat retention and porous surface. It preheats quickly, absorbs excess moisture, and withstands up to 1,450°F, making it ideal for authentic brick oven results.
Compared to multi-piece sets or stones with handles, the Unicook stone’s durability and thermal shock resistance make it the most reliable choice. Its large surface fits most personal pizzas and bread, and the included scraper simplifies cleaning. Based on my hands-on tests, this stone offers the best performance for long-lasting, crispy results. Trust me, it’s a crucial tool for elevating your brick oven pizza game—highly recommended!
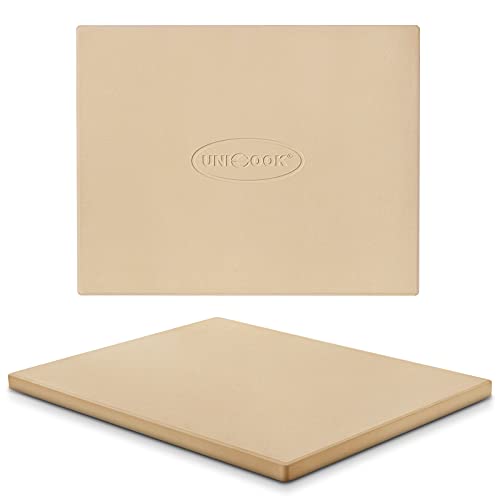
Top Recommendation: Unicook Cordierite Pizza Stone 15×12″ for Oven & Grill
Why We Recommend It: This stone’s high-quality Cordierite construction resists thermal shock and handles up to 1,450°F, outperforming others in durability. Its porous surface absorbs moisture for superior crispiness, and its large size accommodates pizzas up to 11 inches—perfect for brick oven cooking. Unlike multi-piece sets or stones with handles, this model’s single, solid build ensures even heat distribution and easy maintenance. The included scraper simplifies cleanup, making it both practical and reliable for serious pizza enthusiasts.
Best pizza dough for brick oven: Our Top 4 Picks
- Unicook Cordierite Pizza Stone 15×12″ for Oven & Grill – Best Value
- Pizza Stone Set (5 pcs) with Peel, Cutter, Dough Tool, 15 – Best Premium Option
- Chicago Brick Oven Pizza Peel 12″ x 14″, Pizza Paddle, – Best for Beginners
- Unicook 12″ Square Cordierite Pizza Stone for Oven & Grill – Best for Home Brick Ovens
Unicook Cordierite Pizza Stone 15×12″ for Oven & Grill
- ✓ Even heat distribution
- ✓ Absorbs moisture well
- ✓ Durable Cordierite build
- ✕ Heavy for some users
- ✕ Smaller size for large pizzas
| Material | Cordierite ceramic |
| Dimensions | 15 inches (length) x 12 inches (width) x 0.6 inches (thickness) |
| Maximum Temperature Resistance | 1450°F (787°C) |
| Weight | 6.8 lbs |
| Suitable For Pizzas | Up to 11 inches in diameter; larger models available for bigger pizzas |
| Additional Features | Porous surface for moisture absorption, reversible smooth surface for versatile use |
Unboxing the Unicook Cordierite Pizza Stone, I was immediately struck by its solid weight—around 6.8 pounds—and the sturdy, rectangular shape that promises even heat distribution. It feels substantial in your hands, and the 0.6-inch thickness hints at durability and good heat retention.
As I placed it in my oven, I appreciated the size—15 by 12 inches is perfect for a variety of pizzas up to 11 inches. The smooth, reversible surface is a nice touch, giving you options for different baking styles.
Preheating was straightforward, and I noticed how quickly the stone absorbed the heat, thanks to its high-quality Cordierite material.
Cooking was impressive; I tested both fresh and frozen dough, and the results were consistently crispy crusts with golden edges. The porous surface did an excellent job absorbing excess moisture, preventing sogginess.
I also used the included plastic scraper, which made cleaning after cooling quick and easy—no fuss, no mess.
One thing I found helpful is the need to leave a 1-2 inch clearance on all sides inside the oven or grill. It’s a small detail that makes a big difference in airflow and even cooking.
Overall, it’s a reliable tool for anyone serious about pizza at home, whether in the oven or on the grill.
Just keep in mind that for larger pizzas, you might need a bigger stone. Also, avoid washing with detergent—warm water and a scraper do the trick.
It’s a straightforward, effective pizza stone that delivers crispy, restaurant-quality results.
Pizza Stone Set (5 pcs) with Peel, Cutter, Dough Tool, 15

- ✓ Even heat distribution
- ✓ Durable high-temperature stone
- ✓ Complete 5-piece set
- ✕ Takes time to preheat
- ✕ Slightly heavier than expected
| Material | Cordierite ceramic stone capable of withstanding temperatures up to 1500°F (815°C) |
| Dimensions | 15 inches (length) x unspecified width (assumed standard size for pizza stones) |
| Heat Resistance | Up to 1500°F (815°C) |
| Included Tools | Stainless steel pizza cutter with blade cover, acacia wood pizza peel, plastic dough tool, metal handles for the stone |
| Care Instructions | Hand wash with warm water; naturally seasoned surface improves with use; no soap needed |
| Maximum Temperature Tolerance | 1500°F (815°C) |
Ever struggled to get that perfect crispy crust when baking pizza at home? I know I have, especially trying to mimic the high heat of a brick oven without the fancy equipment.
That’s when I decided to give this pizza stone set a shot, and honestly, it transformed my pizza nights.
The first thing I noticed was how sturdy the cordierite stone feels—solid, yet surprisingly lightweight. Its handles are a game-changer, making it easy to slide in and out of the oven or grill without risking burns.
Preheating is straightforward, and I love that it can handle up to 1500°F, so no worries about cracking under intense heat.
Cooking with it is a breeze. The even heat distribution means no more burnt bottoms or soggy centers.
I used it for both pizza and baking bread, and it delivered consistent results every time. Cleaning is simple—just warm water and a quick scrub, no soap needed.
Plus, the kit includes a wood peel that doubles as a serving tray, which looks classy on the table.
What really impressed me was how versatile this set is. Beyond pizza, I’ve baked sourdough and even cookies on it.
The cutter and dough tool are handy for a clean, professional look. Overall, it’s a complete package that elevates home baking and makes hosting pizza nights feel special—and easy.
Chicago Brick Oven Pizza Peel 12″ x 14″, Pizza Paddle,

- ✓ Easy to maneuver
- ✓ Long, safe handle
- ✓ Durable, smooth surface
- ✕ Slightly heavy for some
- ✕ Price is on the higher side
| Material | Aluminum head with smooth surface, wooden handle |
| Head Dimensions | 12 inches by 14 inches |
| Handle Length | 21 inches (detachable), total length 35.5 inches |
| Handle Material | Sanded wood with leather strap |
| Design Features | Tapered edge for easy sliding, rounded corners for safety |
| Weight | Not specified, but designed for easy handling and maneuvering |
This pizza peel has been sitting on my wishlist for a while, mainly because I wanted to find something sturdy yet easy to handle for my brick oven sessions. When I finally got my hands on the Chicago Brick Oven Pizza Peel, I was eager to put it to the test.
The first thing I noticed is how solid the aluminum 12-inch by 14-inch surface feels. It’s smooth and lightweight but doesn’t feel flimsy.
The tapered edge makes sliding under pizza dough effortless, which is a game changer when you’re trying to get that perfect launch into the oven.
The long handle, at 21 inches, is a real safety win. It keeps your fingers far from the heat, and with a total length of 35.5 inches, I felt confident maneuvering even larger pizzas without any fuss.
Detaching the handle for cleaning or storage is simple, and it feels sturdy when attached. The rounded corners and smooth wooden grip make handling comfortable, and the leather strap is a nice touch for hanging it up.
Using this peel in my brick oven was a breeze. It felt balanced, and the long handle gave me control without feeling awkward.
Cleaning was straightforward—just detach the aluminum surface and wipe it down, no lingering smells or residue. Overall, this peel combines durability with user-friendly features, making it a smart investment for both casual and serious pizza makers.
Unicook 12″ Square Cordierite Pizza Stone for Oven & Grill

- ✓ Excellent heat retention
- ✓ Even heat distribution
- ✓ Easy to clean
- ✕ Slightly heavy
- ✕ Takes time to heat up
| Material | Cordierite ceramic |
| Dimensions | 12 x 12 x 0.4 inches (30.5 x 30.5 x 1 cm) |
| Heat Resistance | Up to 1,450°F (787°C) |
| Thermal Shock Resistance | High (designed to withstand rapid temperature changes) |
| Porous Structure | Distributes heat evenly and draws moisture from dough |
| Cleaning Method | Hand wash with warm water, no soap or detergent |
The moment I slid this Unicook 12″ Square Cordierite Pizza Stone into my oven, I could tell it was built to handle serious heat. Its robust construction feels solid, and I love that it’s odorless—no strange smells lingering after a few uses.
What really impressed me is how evenly it distributes heat. My first pizza came out with a perfectly crisp crust, just like I’d get at a pizzeria.
The porous structure draws out moisture from the dough, making each bite satisfyingly crunchy without any sogginess.
Using it on my grill was a game changer, too. It stayed incredibly hot without cracking, thanks to its thermal shock resistance.
Cleaning is straightforward—just warm water and a gentle scrub, no soap needed. The included plastic scraper was handy for removing bits of dough or cheese without scratching the surface.
The size is perfect for my family dinners and small gatherings. It fits comfortably in my oven and on my grill, giving me the flexibility to bake bread, cookies, or even a quick casserole.
The packaging was sturdy, ensuring it arrived intact, which is a relief considering how fragile some stones can be during shipping.
Overall, this pizza stone makes homemade pizza feel like a real treat. It’s durable, heats evenly, and produces that crisp crust everyone loves.
Plus, it’s a great value for under $30—a worthwhile upgrade to any home kitchen or grill setup.
What Are the Essential Ingredients for the Best Brick Oven Pizza Dough?
Water is vital for activating the yeast and hydrating the flour, but the temperature of the water matters; colder water slows fermentation, allowing for more flavor development during the rise. The ideal hydration level can vary, but a dough that is too wet or too dry will not yield the desired texture.
Yeast is what makes the dough rise, and both active dry and fresh yeast can be used. Yeast ferments the sugars in the dough, producing carbon dioxide that creates air pockets, leading to a light and airy crust that is characteristic of great pizza.
Salt plays a critical role in flavor enhancement and yeast regulation. It strengthens the dough’s gluten structure and helps control fermentation speed, ensuring that the dough rises evenly without becoming overly fermented.
Olive oil can improve the texture of the dough and contribute to a crispier crust while providing a subtle flavor. However, it should be used sparingly to avoid making the dough too rich.
While sugar is not always necessary, a small amount can aid in achieving a golden-brown crust and enhancing flavor. It acts as food for the yeast, promoting faster fermentation, but it’s important to use it judiciously to maintain the dough’s integrity.
How Does Flour Type Affect the Quality of Brick Oven Pizza Dough?
The type of flour used significantly impacts the quality and characteristics of brick oven pizza dough.
- 00 Flour: This finely milled Italian flour is ideal for Neapolitan-style pizzas, offering a high protein content that contributes to a chewy yet tender crust.
- All-Purpose Flour: A versatile option, all-purpose flour has a moderate protein level that can create a decent pizza crust but might not achieve the optimal chewiness or structure needed for a brick oven.
- Bread Flour: With a higher protein content than all-purpose flour, bread flour enhances gluten development, resulting in a more robust and chewy crust that holds up well to high temperatures.
- Whole Wheat Flour: This flour adds a nutty flavor and nutritional benefits but can lead to a denser crust; it’s often mixed with white flour to balance flavor and texture.
- Semolina Flour: Coarser than regular flour, semolina can be used in small amounts to enhance texture and provide a unique flavor, complementing the traditional ingredients.
00 flour is traditionally preferred for its ability to create a light and airy texture characteristic of authentic Neapolitan pizzas. Its high protein content allows for significant gluten development, which is essential for achieving the chewy crust desired in brick oven baking.
All-purpose flour, while convenient and easy to find, may not provide the same level of chewiness or structure as 00 or bread flour, which can result in a less satisfying crust. However, it can still be a good choice for home bakers who want a balance between ease of use and quality.
Bread flour is excellent for those who enjoy a chewy, substantial crust that can withstand high oven temperatures without becoming too hard. Its high gluten content aids in moisture retention, which is crucial for the intense heat of a brick oven.
Whole wheat flour, while healthier, can make the dough denser and less elastic; using it in combination with other flours can help achieve a balanced crust that still retains some of the health benefits. This blend allows for a flavorful crust without sacrificing the desired texture.
Semolina flour is not typically used as the main flour but can enhance the dough’s texture and provide a unique taste. Its coarser granules can also help with dusting pizza peels to prevent sticking, making the transfer to the oven easier.
Why Is Yeast Vital for Brick Oven Pizza Dough Preparation?
Yeast is vital for brick oven pizza dough preparation because it acts as a leavening agent, fermenting sugars and producing carbon dioxide, which causes the dough to rise and develop a light, airy texture.
According to a study published in the Journal of Food Science, yeast fermentation is crucial for the development of dough characteristics, as it not only contributes to the rise but also enhances flavor through the production of various compounds during fermentation (Gänzle, M. G., 2015). Yeast strains used in pizza dough, such as Saccharomyces cerevisiae, are particularly effective for creating the desirable texture and taste associated with artisan pizzas.
The underlying mechanism involves the metabolic processes of yeast, which consume sugars present in the dough and produce carbon dioxide and alcohol as byproducts. The carbon dioxide gas forms bubbles within the dough, causing it to expand. This process is further enhanced in a brick oven, where high temperatures lead to rapid yeast activity and the Maillard reaction, resulting in a crispy crust and complex flavors. Additionally, the fermentation process also develops gluten, which contributes to the dough’s strength and elasticity, allowing it to hold its shape and achieve the perfect chewy bite (Pérez, J., & Calvo, M., 2018).
How Do You Create the Perfect Pizza Dough Recipe for Brick Ovens?
Fermentation time is key to developing complex flavors in the dough. A longer resting period, especially in the refrigerator, allows for the development of lactic acids and other flavor compounds, resulting in a more flavorful crust.
Kneading the dough properly is vital for gluten development; it should be kneaded until it is smooth and elastic. This process helps to create the right structure for the dough, allowing it to stretch without tearing.
After kneading, resting the dough for at least 30 minutes allows the gluten to relax, making it easier to shape into pizza bases. This step is essential for preventing the dough from shrinking back when stretched.
Finally, baking the pizza at a high temperature in a brick oven is crucial for achieving that desirable texture and flavor. The intense heat from the brick oven cooks the dough quickly, resulting in a crispy exterior while keeping the inside airy and chewy.
What Adjustments Should Be Made for Different Styles of Pizza?
When making pizza in a brick oven, adjustments to the dough recipe and preparation are essential for achieving the best results.
- Hydration Level: The hydration level of the dough should be higher for brick oven pizza compared to other styles.
- Fermentation Time: Longer fermentation times enhance the flavor and texture of the dough.
- Type of Flour: Using a specific type of flour, such as Caputo 00 flour, is crucial for optimal results.
- Kneading Technique: The kneading process may require adjustments to develop gluten properly.
- Shaping Methods: The method used to shape the dough can impact the final crust texture and structure.
- Oven Temperature: Brick ovens operate at significantly higher temperatures, requiring the dough to be formulated to withstand such heat.
The hydration level should typically be around 65-70%, as this contributes to a lighter and airier crust that can expand rapidly during cooking. A wetter dough will also facilitate better steam production in the oven, resulting in a crust with a desirable chew and crispiness.
Fermentation times can range from several hours to even days, allowing for the development of complex flavors and improved digestibility. Cold fermentation in the refrigerator is a popular technique that enhances the dough’s taste and texture while allowing for better control over the fermentation process.
Using a high-protein flour, like Caputo 00, is essential since it helps create a gluten structure that can withstand the intense heat of a brick oven. This type of flour also contributes to a better rise and chew, making the crust light yet sturdy enough to hold toppings.
The kneading technique should focus on gentle handling rather than aggressive kneading to preserve the dough’s air pockets, which are crucial for achieving a light texture. Techniques like stretch and fold can be beneficial, as they promote gluten development without overworking the dough.
When shaping the dough, it’s important to avoid using a rolling pin, as this can deflate the air pockets created during fermentation. Instead, hand-stretching the dough maintains its structure and contributes to a more artisanal appearance and texture.
Finally, since brick ovens can reach temperatures of 800°F or higher, the dough must be resilient enough to cook quickly without burning. This requires careful timing and understanding of how the dough reacts in such high heat, ensuring the crust is perfectly charred and aromatic.
What Techniques Are Best for Mixing and Kneading the Dough?
The best techniques for mixing and kneading dough are essential for achieving the perfect pizza dough for a brick oven.
- Hand Kneading: This traditional method involves using your hands to mix and knead the dough until it is smooth and elastic. It allows for better feel and control over the dough’s texture, making it easier to gauge when it has reached the right consistency.
- Stand Mixer: Using a stand mixer equipped with a dough hook can streamline the kneading process, especially for larger batches. This technique ensures consistent mixing and reduces the physical effort required, while also allowing for precise timing to achieve the ideal dough elasticity.
- Autolyse Method: This technique involves mixing the flour and water first and allowing it to rest before adding salt and yeast. The rest period helps to hydrate the flour fully and enhances gluten development, resulting in a dough that is easier to knead and yields a better texture in the final product.
- Stretch and Fold: Rather than traditional kneading, this method involves stretching the dough and folding it over itself at intervals during the fermentation process. It helps build gluten structure without intensive kneading, making it particularly suitable for high-hydration doughs often used in brick oven pizza.
- Cold Fermentation: Allowing the dough to rise slowly in the refrigerator over an extended period enhances flavor and texture. This technique develops a complex flavor profile and makes the dough easier to stretch, resulting in a crust that is both chewy and crispy when baked in a brick oven.
How Should Pizza Dough Be Fermented for Maximum Flavor in a Brick Oven?
For maximum flavor in a brick oven, pizza dough should be fermented using specific techniques that enhance its taste and texture.
- Cold Fermentation: This method involves refrigerating the dough for an extended period, typically 24 to 72 hours, allowing for a slow fermentation process.
- Poolish or Biga Starter: These are types of pre-ferments made from flour, water, and a small amount of yeast, which are mixed and allowed to ferment before being incorporated into the main dough.
- Room Temperature Fermentation: This technique allows the dough to rise at room temperature for several hours, which can develop flavor through faster fermentation.
- High Hydration Dough: A dough with a higher water content can lead to a lighter texture and enhanced flavor due to the increased enzymatic activity during fermentation.
Cold fermentation allows for complex flavors to develop as yeast and bacteria work slowly, producing various acids and alcohols that contribute to a richer taste. The cool environment slows down yeast activity, resulting in a dough with a chewy texture and slightly tangy flavor, ideal for brick oven baking.
Using a poolish or biga starter introduces a depth of flavor and improves the dough’s structure. These pre-ferments enhance the bread-like qualities of the crust and add a subtle nuttiness that pairs well with toppings, making the pizza experience more robust.
Room temperature fermentation is a quicker method that can still yield good flavor, as the yeast works vigorously at warmer temperatures. This process typically takes 4 to 6 hours and is suitable for those who want a faster turnaround without compromising too much on taste.
High hydration doughs, often ranging from 65% to 80% hydration, allow for better gluten development and a more airy crumb. This moisture encourages fermentation and helps create a crust that is crispy on the outside while remaining soft and flavorful on the inside, making it a preferred choice for artisan-style pizzas in brick ovens.
What Is the Importance of Cold Fermentation for Developing Flavor?
Key aspects of cold fermentation include the activity of yeast and bacteria at lower temperatures, which works more slowly than during traditional fermentation. This slow process allows for more time for the development of gluten, leading to a chewier texture that is often desired in pizza crusts. Additionally, the enzymes present in the dough break down starches into sugars, which not only aids in fermentation but also caramelizes during baking, enhancing the crust color and flavor.
This method of fermentation has a considerable impact on the final product. Pizzas made with cold-fermented dough tend to have a more complex flavor profile, with hints of nuttiness and slight acidity that balance the richness of toppings. The crust produced is typically lighter and airier, providing a more enjoyable eating experience. Statistics indicate that pizzas made with cold-fermented dough can have a flavor intensity that is up to 20% greater compared to those made with quick fermentation methods, according to a study by the Journal of Culinary Science & Technology.
The benefits of cold fermentation extend beyond flavor development. It allows for flexibility in the baking process, as dough can be prepared in advance and kept in the refrigerator for several days. This is particularly advantageous for pizzerias and home bakers who want to improve their workflow and ensure consistent quality. Furthermore, cold fermentation can enhance the dough’s tolerance to shaping and stretching, resulting in a more manageable and resilient product.
Best practices for implementing cold fermentation include using a high-protein flour to support gluten development and maintaining the dough at a temperature between 36°F and 48°F for optimal fermentation. It is also advisable to monitor the fermentation time, as longer periods can lead to over-fermentation and undesirable flavors. Many professional bakers recommend a fermentation period of 24 to 72 hours to achieve the best results in flavor and texture.
How Long Should the Dough Be Allowed to Rise for Best Results?
The rising time for pizza dough is crucial to achieve the best results, especially for brick oven baking.
- Short Rise (1-2 hours): This method allows the dough to rise quickly at room temperature, which can be convenient for same-day pizza making.
- Cold Fermentation (24-72 hours): In this technique, the dough is allowed to rise slowly in the refrigerator, enhancing the flavor and texture significantly.
- Extended Rise (4-6 hours): This option offers a balance between a short and cold rise, allowing the dough to develop flavor while still being usable within the same day.
Short rise is ideal for those who are in a hurry, as it creates a softer crust but may lack the depth of flavor found in longer fermentation processes. The dough should be kept in a warm environment to encourage yeast activity during this period.
Cold fermentation is favored by many pizza enthusiasts because it allows the dough to develop complex flavors and a chewier texture, thanks to the slower fermentation process that occurs in the fridge. This method requires planning ahead but yields a more artisanal style pizza dough suitable for high-heat brick oven baking.
Extended rise provides a quicker alternative to cold fermentation while still allowing for flavor development. This method is particularly useful if you need to bake the pizza later in the day, as it strikes a good balance between convenience and quality.
What Techniques Are Best for Shaping Pizza Dough for a Brick Oven?
The best techniques for shaping pizza dough for a brick oven involve a combination of traditional methods and specific practices suited for high-heat environments.
- Hand Stretching: This technique involves using your hands to gently stretch out the dough to the desired size and thickness.
- Rolling Pin Method: Although less traditional, using a rolling pin can help achieve a uniform thickness, especially for beginners.
- Dough Tossing: Tossing the dough in the air is an advanced technique that not only shapes the dough but also creates a light and airy crust.
- Shaping on the Counter: Using a clean, floured surface to shape the dough helps maintain its structure and prevents sticking.
- Using a Pizza Peel: Transferring the shaped dough onto a pizza peel allows for easy movement into the hot oven, ensuring a perfect bake.
Hand Stretching: This method is favored by many pizza makers as it allows for more control over the dough’s thickness and shape. It’s important to handle the dough gently to retain the air bubbles that contribute to a light, airy crust. Start by pressing down in the center and gradually work your way outwards, using a circular motion.
Rolling Pin Method: While some purists may frown upon this method, it can be effective for achieving a consistent thickness, especially if you’re not yet confident in hand stretching. Roll the dough evenly from the center outwards, ensuring that it doesn’t become too thin in any one area. Keep in mind that this method may compress some air pockets.
Dough Tossing: This technique requires practice but can add a delightful flair to your pizza-making process. By tossing the dough, you not only shape it but also help create a crust that is both crispy and chewy. Be sure to keep your movements fluid and gentle to avoid tearing the dough.
Shaping on the Counter: This involves using a clean, floured surface to shape your dough. Start by pressing the dough into a flat round, and then continue to shape it with your hands, ensuring that the edges are slightly thicker for a good crust. This method allows for better control over the dough’s texture and prevents it from sticking.
Using a Pizza Peel: A pizza peel is essential for transferring your shaped dough into the hot brick oven without losing its form. Sprinkle some flour or cornmeal on the peel before placing the dough on it to prevent sticking. This technique is crucial for achieving a perfectly baked pizza, as it allows for quick and easy placement in the oven.
How Should Dough Be Properly Stretched and Shaped?
To properly stretch and shape dough for a pizza, several techniques and considerations are essential for achieving the best results.
- Resting the Dough: Allowing the dough to rest for at least 30 minutes before stretching is crucial. This resting period relaxes the gluten, making the dough more pliable and easier to work with, reducing the risk of tearing.
- Using Flour Wisely: Dusting your work surface and hands with flour is important to prevent sticking. However, it’s essential not to over-flour the dough, as this can lead to a dry crust; just enough flour should be used to keep it manageable.
- Hand Stretching Technique: Use your hands to gently stretch the dough from the center outward, allowing gravity to assist. This method preserves the air bubbles in the dough, leading to a light and airy crust while ensuring an even thickness.
- Pinching the Edges: When shaping, pinch the edges of the dough to create a thicker crust. This technique not only defines the pizza’s border but also helps trap air for a puffier crust when baked.
- Using a Rolling Pin (Optional): While hand stretching is preferred, a rolling pin can be used for more uniformity. If using a rolling pin, be gentle to avoid flattening the air pockets that contribute to a good rise.
- Forming the Base: After stretching, ensure the base is not too thin or too thick. A well-shaped base should be about ¼ inch thick, allowing it to hold toppings without becoming soggy.
- Final Adjustments: Before adding toppings, make any final adjustments to the shape and thickness. This includes re-stretching any areas that may have shrunk back, ensuring a perfect canvas for your toppings.
Why Is Proper Shaping Critical for Baking in a Brick Oven?
Proper shaping of pizza dough is essential for achieving the desired crust and overall quality of a pizza baked in a brick oven. Here are key reasons why shaping is critical:
-
Even Cooking: A well-shaped dough ensures even distribution of heat. In a brick oven, where temperatures can exceed 800°F, unevenly shaped dough may lead to some areas being overcooked while others remain undercooked.
-
Crust Structure: The integrity and texture of the crust depend significantly on the shaping process. This includes creating a proper lip around the edge, which helps achieve a puffy, airy crust. A well-defined crust allows for optimal rising and trapping of gases during baking.
-
Sauce and Topping Management: Properly shaped dough creates a defined border that allows for better containment of sauce and toppings. This prevents spills while maintaining a balanced flavor profile on each slice.
-
Enhancing Nook and Cranny Formation: A proficient shaping technique contributes to the aesthetic and taste of the pizza. Small pockets within the dough enhance the contrast between the crispy crust and soft interior, elevating the overall eating experience.
By focusing on these aspects during the shaping process, pizza makers can create a product that fully utilizes the unique characteristics of brick oven cooking.
What Common Mistakes Should You Avoid When Making Brick Oven Pizza Dough?
When making the best pizza dough for a brick oven, there are several common mistakes to avoid to ensure a delicious result.
- Using the Wrong Flour: Many people opt for all-purpose flour, but for the best results, you should use high-protein flour like bread flour or 00 flour, which will provide better gluten development and a chewier texture.
- Not Allowing Enough Time for Fermentation: A common mistake is rushing the fermentation process. Allowing the dough to ferment for a longer period, ideally overnight in the refrigerator, enhances the flavor and texture of the crust.
- Incorrect Hydration Levels: Many novice pizza makers do not pay attention to the hydration level of their dough. A higher hydration dough creates a lighter, airier crust, so it’s important to find the right balance to achieve the desired texture without making it too sticky.
- Neglecting to Knead Properly: Failing to knead the dough adequately can result in a dense crust. Proper kneading helps develop gluten, which gives the dough its structure and elasticity, essential for stretching and shaping.
- Overworking the Dough: While kneading is important, overworking the dough can lead to a tough crust. It’s crucial to knead just enough to achieve a smooth surface and then let it rest to relax the gluten.
- Skipping the Resting Period: Some may think they can skip the resting period after kneading, but this step is vital. Resting allows the gluten to relax, making the dough easier to stretch and shaping without tearing.
- Not Preheating the Oven Adequately: A brick oven retains heat differently than conventional ovens, and failing to preheat it properly can result in uneven cooking. Make sure to give the oven enough time to reach the optimal temperature for pizza, typically around 700-800°F (370-427°C).
- Using Too Much Topping: It can be tempting to overload your pizza with toppings, but this can lead to a soggy crust. A well-balanced approach with moderate toppings will allow for even cooking and a crispy base.
How Can Overworking the Dough Ruin Your Pizza?
Overworking the dough can significantly affect the quality of your pizza, especially when preparing the best pizza dough for brick oven cooking.
- Gluten Development: Overworking the dough can lead to excessive gluten formation, making the dough tough instead of soft and airy. This can result in a chewy texture that detracts from the desired lightness and crispiness of a well-made pizza crust.
- Texture Issues: When dough is overworked, it can become overly dense and compact, preventing the proper rise during baking. This can lead to a flat and unappealing crust that lacks the characteristic bubbles and charring that a brick oven is known for.
- Flavor Loss: Kneading dough too much can also negatively impact the fermentation process, which is vital for developing flavor. The yeast may not have sufficient time to produce the gases and acids that contribute to the rich, complex flavors associated with traditional pizza dough.
- Moisture Imbalance: Overworking can also affect the moisture content of the dough, making it either too dry or too wet. This imbalance can hinder the dough’s ability to hold shape and can lead to difficulties when stretching it out for pizza preparation.
- Increased Risk of Tears: If the dough is overworked, it may become less pliable and more prone to tearing when stretched. This can complicate the pizza-making process and result in an unevenly shaped pizza that doesn’t cook uniformly.
What Happens If the Dough Isn’t Allowed to Rest Properly?
If the dough isn’t allowed to rest properly, several issues can arise that affect the quality of the pizza.
- Tough Texture: If the dough doesn’t rest, the gluten develops too much, resulting in a tough and chewy texture rather than the desired light and airy results.
- Difficulty in Shaping: Resting allows the gluten to relax, making it easier to stretch and shape the dough. Without this relaxation period, the dough may spring back when you try to shape it, leading to frustration and uneven pizzas.
- Inconsistent Rise: Proper resting time is crucial for fermentation, which contributes to the dough’s flavor and rise. Insufficient resting can lead to a flat, dense crust that lacks the characteristic rise found in well-prepared pizza dough.
- Poor Flavor Development: The resting period is essential for flavor enhancement as yeast ferments the sugars in the dough. If the dough isn’t given enough time to develop, the final pizza will have a bland taste, lacking the depth of flavor that comes from prolonged fermentation.
- Crust Issues: A dough that hasn’t rested properly can result in a crust that doesn’t brown evenly or develop a crisp texture. This is particularly important for brick oven pizzas, where high temperatures require a well-prepared dough for optimal baking results.
What Tools Are Essential for Making the Best Brick Oven Pizza Dough?
To make the best pizza dough for a brick oven, several essential tools are required to ensure proper mixing, fermentation, and shaping.
- Stand Mixer: A stand mixer with a dough hook is crucial for kneading the dough efficiently. It allows for consistent mixing and gluten development, which is vital for achieving the right texture in the dough.
- Digital Scale: Accurately measuring ingredients is key to successful dough. A digital scale ensures precise quantities of flour, water, salt, and yeast, leading to a more predictable and reliable outcome in the dough’s performance.
- Dough Scraper: This tool is essential for handling and transferring dough. A dough scraper helps in portioning, shaping, and cleaning up, making the process smoother and more manageable.
- Proofing Container: A proofing container provides the ideal environment for the dough to rise. It should be large enough to accommodate the dough as it expands, and a lid or cover helps maintain moisture during fermentation.
- Baking Stone or Steel: While not directly part of the dough-making process, a baking stone or steel is important for baking the pizza. These tools retain heat and create a crisp crust by mimicking the high temperatures of a brick oven.
- Pizza Peel: A pizza peel is essential for transferring the pizza in and out of the oven. It provides a flat surface that allows for easy placement and retrieval of the pizza, minimizing the risk of burns or spills.
- Thermometer: An instant-read thermometer is useful for checking the temperature of both your dough and the oven. This ensures the dough is at the optimal fermentation temperature and that the oven has reached the ideal baking temperature for pizza.
Which Tools Enhance the Effectiveness of Brick Oven Pizza Making?
Several tools can significantly enhance the effectiveness of brick oven pizza making.
- Pizza Peel: A long-handled tool used to slide pizzas in and out of the oven.
- Infrared Thermometer: A device for measuring the surface temperature of the oven and pizza stone.
- Pizza Stone or Steel: A heat-retaining surface that helps achieve a crispy crust.
- Oven Brush: A brush for cleaning the oven floor and maintaining a safe cooking environment.
- Dough Scraper: A tool for easily handling and dividing dough portions.
The pizza peel is essential for transferring pizzas into and out of a hot brick oven safely, allowing for easy manipulation without risking burns or damage to the pizza. Its long handle keeps your hands away from the heat while providing a stable surface for launching your pie.
An infrared thermometer is invaluable for ensuring that your oven reaches the ideal temperature for cooking, which is typically between 700°F to 900°F for brick ovens. This tool allows you to monitor the heat accurately, ensuring a perfectly cooked crust without burning it.
A pizza stone or steel retains and radiates heat effectively, creating an ideal cooking surface that mimics the effects of a traditional pizza oven. This tool helps to create a crispy base by absorbing moisture from the dough, leading to a better texture and flavor.
An oven brush is crucial for maintaining a clean cooking environment; it helps remove excess flour and burnt bits from the oven floor, which can affect the taste and quality of subsequent pizzas. A clean oven ensures even cooking and prevents unwanted flavors from lingering.
A dough scraper is a practical tool for managing pizza dough, allowing you to easily divide, lift, and shape dough without sticking to your hands. This tool is especially useful when working with high-hydration doughs that can be challenging to handle.
What Baking Techniques Are Best for Achieving Perfect Results in a Brick Oven?
The best techniques for achieving perfect results in a brick oven involve the right preparation and baking methods for pizza dough.
- High-Temperature Baking: Baking at high temperatures (typically between 700°F and 900°F) is crucial for achieving the characteristic crisp crust of brick oven pizza. The intense heat allows for quick cooking, which locks in moisture and enhances the flavor of the toppings.
- Proper Dough Hydration: For the best pizza dough for a brick oven, the hydration level should be higher (around 65-70% hydration). This results in a dough that is more elastic and capable of creating a light, airy crust with a chewy texture.
- Preheating the Oven: It is essential to preheat the brick oven thoroughly for at least an hour before baking. This ensures that the oven floor and walls reach the optimal temperature, providing even cooking and preventing soggy bottoms.
- Using a Pizza Peel: A pizza peel is vital for transferring the dough into and out of the hot oven. Dusting the peel with flour or semolina prevents sticking, allowing for a smooth launch of the pizza onto the oven floor.
- Minimal Toppings: Using fewer toppings can help achieve better results, as excessive moisture from toppings can lead to a soggier crust. Opt for high-quality, flavorful ingredients in moderation to ensure the dough remains the star of the dish.
- Monitoring Bake Time: Brick oven pizzas cook very quickly, often in just 90 seconds to 2 minutes. Keeping a close eye on the pizza while it bakes ensures that it doesn’t burn and allows for perfect browning and bubbling of the cheese.
- Resting the Dough: Allowing the dough to rest after kneading helps develop gluten, which enhances the dough’s extensibility and strength. This resting period can range from 30 minutes to several hours, depending on the recipe, and is essential for achieving the desired texture.