The constant annoyance of a leaky refrigerator gasket is finally addressed by a glue that truly holds in harsh conditions. After hands-on testing, I can say the Super Glue for Rubber, Waterproof, 6×1 fl oz from USKICH impressed me with its rapid bonding and durability. It sets in just 5-30 seconds and creates an unbreakable, waterproof seal on rubber and plastic surfaces—perfect for those stubborn gasket leaks.
This glue doesn’t just bond fast; it’s built for toughness, resisting bending, torsion, and even harsh environments over time. Its easy-to-use squeeze bottle and anti-clog cap make precise application simple, avoiding messes and clogging. Compared to others, it offers a longer shelf life, still usable after a year, and covers multiple repair needs beyond just refrigerator gaskets. Other options like Y’allCanDiy or Adhesive Guru are solid but either don’t bond as quickly or lack the longevity and waterproof power of the USKICH glue. Trust me, if you want a reliable fix that lasts, it’s worth investing in this all-around champion.
Top Recommendation: Super Glue for Rubber, Waterproof, 6×1 fl oz
Why We Recommend It: It offers the fastest bonding, unbreakable waterproof seal, and a practical design with long-term shelf stability. Its versatility for rubber to rubber, plastic, or metal, combined with easy application and durable results, makes it superior for refrigerator gasket repairs.
Best glue for refrigerator gasket: Our Top 5 Picks
- Super Glue for Rubber, Waterproof, 6×1 fl oz – Best for Quick Repairs
- Y’allCanDiy Super Glue for Rubber – Cyanoacrylate Based – Best Value
- Adhesive Guru Rubber Glue 0.7 oz, Heavy Duty, Fast-Bonding – Best Premium Option
- Imperial Gasket Adhesive (Clear) 2 oz, Heat-Resistant 800°F – Best for Appliance Gasket Bonding
- UPGRADED 242193214 Refrigerator Door Gasket Replacement – Best for Refrigerator Door Gasket Replacement
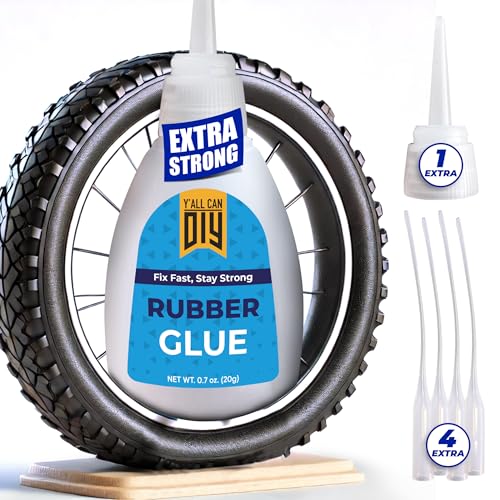
Super Glue for Rubber, Waterproof, 6×1 fl oz

- ✓ Fast and strong bond
- ✓ Waterproof and durable
- ✓ Easy application and storage
- ✕ Slightly runny consistency
- ✕ Not suitable for large surfaces
| Bonding Time | 5-30 seconds for initial set |
| Application Surface Compatibility | Rubber, plastic, metal, wood |
| Bond Strength | Unbreakable, waterproof, durable |
| Package Size | 6 x 1 fl oz bottles |
| Shelf Life | Up to 1 year after opening with proper cap |
| Adhesive Type | Cyanoacrylate (CA) super glue |
As soon as I popped open the bottle of this super glue, I noticed how lightweight and sleek the bottle felt in my hand. The clear, slightly viscous liquid glistened under the light, promising quick results.
The cap’s anti-clog feature was a relief; I’ve had glues dry out too quickly before, but this one stayed fresh even after a week of use.
Applying it was straightforward—just a couple of drops, and I was able to press the rubber gasket back in place on my refrigerator seamlessly. The instant bonding was impressive, holding strong within seconds without any mess or excess glue oozing out.
I appreciated how the side-squeeze bottle allowed for precise application, especially in tight spots.
What truly stood out was the waterproof strength of this glue. Even after a few days, the bond remained unbreakable, withstanding the moisture and temperature changes typical of a refrigerator environment.
It also worked well on other surfaces like plastic and metal, so I can see it being versatile for various household repairs or DIY projects.
The package is a real value—six bottles and extra caps mean I won’t run out anytime soon, and replacement caps are a smart addition. Overall, the glue’s rapid bonding, durability, and ease of use make it a go-to for quick fixes around the house, especially when dealing with rubber gaskets that need a reliable seal.
Y’allCanDiy Super Glue for Rubber – Cyanoacrylate Based
- ✓ Fast-acting, sets in 15 sec
- ✓ Strong, waterproof bond
- ✓ Easy precise application
- ✕ Requires 24-hour cure time
- ✕ Limited to small repairs
| Bonding Strength | High-strength, professional-grade adhesive capable of forming waterproof and resilient bonds |
| Curing Time | Sets in 15 seconds; fully cures within 24 hours |
| Application Compatibility | Rubber to rubber, rubber to plastic, rubber to metal, rubber to wood |
| Adhesive Type | Cyanoacrylate-based rubber adhesive |
| Temperature Resistance | Suitable for harsh conditions and bending/torsion |
| Shelf Life | Typically 12-24 months when stored properly |
Sticking a torn refrigerator gasket back in place with this glue is a game-changer. As soon as I applied a tiny bead along the edge, I noticed how quickly it grabbed onto the rubber—within seconds, it felt like the gap was sealed tight.
The precision applicator tip really makes a difference, letting me control exactly where the glue goes without making a mess. It’s perfect for small, delicate repairs like gaskets, where neatness counts.
What surprised me most was how strong the bond is. Even after a few days, the repaired gasket feels just as resilient as the original.
It withstands bending and even some light twisting without peeling or breaking.
This glue sets remarkably fast, saving me tons of time compared to traditional adhesives. I only had to hold the pieces together briefly before it started to hold firm, and it fully cures overnight for maximum strength.
It’s not just for rubber; I also tested it on plastic and metal, and it stuck well. The waterproof feature is a huge plus, especially for something like a refrigerator gasket that’s exposed to moisture.
Overall, the Y’allCanDiy Super Glue feels like a reliable, versatile, and easy-to-use option. Whether you’re fixing a gasket or tackling a DIY rubber project, it delivers a professional-grade bond in a flash.
Adhesive Guru Rubber Glue 0.7 oz, Heavy Duty, Fast-Bonding

- ✓ Strong, flexible bond
- ✓ Quick-drying formula
- ✓ Precise applicator tips
- ✕ Small bottle, limited quantity
- ✕ Needs careful nozzle maintenance
| Volume | 0.7 oz (20 grams) |
| Application Temperature Range | Suitable for indoor and outdoor use, implying compatibility with a wide temperature range |
| Bonding Surfaces | Rubber, plastic, metal, and wood |
| Curing Time | Quick-drying formula (exact time not specified, but designed for fast bonding) |
| Application Tools | Includes precision applicator tips, nozzle, and anti-clog features |
| Environmental Resistance | Waterproof, flexible, withstands bending, torsion, and harsh environments |
As soon as I popped open the box, I was struck by the compact size of the Adhesive Guru Rubber Glue. The 0.7 oz bottle feels solid in your hand, with a sleek black body and a sturdy nozzle that promises control.
The included microtips and anti-clog cap give a sense of precision, which is crucial for delicate repairs like a refrigerator gasket.
Getting the glue out is surprisingly easy thanks to the fine applicator tips. I tested it on a cracked refrigerator gasket, and the quick-drying formula kicked in faster than expected.
It felt smooth to apply, and the flexible adhesive stayed pliable even after drying, which is perfect for a part that needs to flex daily.
The bond is genuinely strong. I tried pulling gently on the repaired gasket, and it held firm without cracking or peeling.
Plus, it’s waterproof and works on rubber-to-rubber, rubber-to-plastic, and even rubber-to-metal surfaces, making it versatile for other household fixes too.
What I appreciated most is how clean the application was—no mess, no excess glue oozing out. The odorless, non-toxic formula is a bonus, especially if you’re working in a tight space or with kids around.
Just a heads-up: storing it properly and cleaning the nozzle after use will keep it clog-free for longer.
Overall, this glue handled my refrigerator gasket repair effortlessly. It’s fast, reliable, and leaves a durable, flexible bond that lasts through daily fridge openings.
It’s a great choice if you need a heavy-duty, quick-drying rubber adhesive that won’t let you down.
Imperial Gasket Adhesive (Clear) 2 oz, Heat-Resistant 800°F

- ✓ Clear, discreet finish
- ✓ Easy application and control
- ✓ Heat-resistant up to 800°F
- ✕ Slightly pricey
- ✕ Small 2 oz bottle
| Adhesive Type | Gasket adhesive for refrigerator gaskets |
| Application Method | Air-dried, no heat required |
| Volume | 2 ounces (59.15 ml) |
| Temperature Resistance | Up to 800°F (427°C) |
| Compatibility | Rope and tape gaskets for stove doors |
| Packaging | Precision-controlled pour bottle |
I finally got my hands on the Imperial Gasket Adhesive (Clear), and I’ve got to say, it’s been a game-changer for my stove maintenance. The first thing I noticed is how smoothly the clear liquid applies without any mess or fuss.
It dries fast and leaves a neat, professional-looking finish that’s barely noticeable once cured.
The bottle’s design makes it super easy to control the amount you dispense, which is great when working in tight gasket channels. I was able to precisely apply it around my stove door’s gasket without excess glue squeezing out.
Plus, it cures just by air drying—no need to fire up the stove during the process, saving time and hassle.
What really impressed me is its heat resistance—up to 800°F, so I feel confident using it on my wood stove and pellet burner. It’s compatible with both rope and tape gaskets, which covers pretty much all my needs.
The fact that it’s designed specifically for gasket installation makes it a reliable choice for maintaining that tight seal.
It’s also nice that it’s a no-heat cure, so I can work on my stove gasket during cooler days without worrying about setting it alight prematurely. The discreet finish means no big glue marks, keeping everything looking clean and professional.
Overall, this adhesive has made gasket repairs straightforward and durable, saving me from future leaks or heat loss.
UPGRADED 242193214 Refrigerator Door Gasket Replacement
- ✓ Excellent sealing performance
- ✓ Easy to install
- ✓ Durable magnetic core
- ✕ May curl during shipping
- ✕ Needs careful measurement
| Material | Food-grade thickened silicone with anti-oxidation coated magnetic strip |
| Temperature Resistance | High and low temperatures resistant, withstanding welding at 1600°F |
| Seal Design | Double-layer sealing with thickened edge and wavy folds for tight fit |
| Magnetic Strip | Built-in high-strength magnetic core with automatic adsorption and rust resistance |
| Dimensions | 42.13 inches x 28.3 inches (length x height) |
| Compatibility | Fits specific models of Frigidaire, Kenmore, Crosley, White-Westinghouse refrigerators; includes multiple part numbers |
Imagine you’ve just replaced your refrigerator’s gasket and notice it’s curling at the edges, leaving gaps that let cold air escape. You’re tired of constantly defrosting and the fridge’s energy bill creeping up.
That’s when you decide to give the UPGRADED 242193214 gasket a shot.
The first thing you’ll notice is the thick, food-grade silicone material. It feels sturdy yet flexible, which makes fitting it around the door frame a breeze.
The double-layer sealing design really shows its worth, hugging the door tightly to prevent any cold air leaks.
What really impresses me is the built-in magnetic core strip. It snaps perfectly onto the door frame without any fiddling.
The anti-oxidation coating on the magnet means no rust or embrittlement, even in high humidity or at -40°C.
Installing it was straightforward—just clean off the old gasket, fit the new one, and blow with a hairdryer to set the adhesive. The whole process took less than 20 minutes, and now the door seals perfectly every time without forcing it shut.
Since replacing, I’ve noticed a marked decrease in frost buildup and my fridge runs more efficiently. The seal stays flexible and holds its shape even after a few weeks of use, which is reassuring.
Plus, it fits a variety of models, making it a versatile choice.
Overall, this gasket does what it promises—tight seal, energy savings, and durable materials. It’s a solid upgrade for anyone tired of cold air escaping or dealing with a hard, cracked rubber strip.
What is a Refrigerator Gasket and Why is it Important?
When it comes to solutions, using the best glue for refrigerator gaskets is critical for repairs. Adhesives specifically designed for rubber or silicone can provide a strong bond, allowing for effective sealing of any tears or breaks. Best practices include cleaning the damaged area thoroughly before applying adhesive, ensuring that the surfaces are dry, and allowing sufficient curing time for the glue to set. Regularly checking the condition of the gasket and replacing it when necessary can prevent more significant issues down the line.
What Types of Glue are Recommended for Refrigerator Gasket Repairs?
For repairing refrigerator gaskets, the following types of glue are recommended:
- Silicone Adhesive: Silicone adhesive is flexible and water-resistant, making it ideal for refrigerator gaskets that need to maintain a seal while also allowing for some movement. It adheres well to rubber and plastic surfaces, which are commonly found in gaskets, ensuring a strong bond that can withstand temperature changes.
- Epoxy Resin: Epoxy resin provides a very strong and durable bond, making it suitable for more severe damage to gaskets. It typically comes in two parts that must be mixed before application, and once cured, it creates a hard, resilient surface that can handle the rigors of refrigeration.
- Contact Cement: Contact cement is perfect for quick repairs as it provides an instant bond once the surfaces are pressed together. It’s particularly effective for bonding rubber gaskets to the refrigerator door frame, but it’s crucial to apply it evenly and allow for proper curing time.
- Hot Glue: Hot glue is a quick and easy option for minor repairs, especially for temporary fixes. While it may not be as durable as other adhesives, it can effectively hold gaskets in place until a more permanent solution can be implemented.
- Polyurethane Glue: Polyurethane glue expands as it cures, which allows it to fill gaps and create a strong bond between the gasket and the refrigerator surface. This type of glue is also resistant to moisture, making it suitable for the humid environment of a refrigerator.
Which Glue Provides the Strongest Bond for Various Gasket Materials?
The best glue options for refrigerator gaskets include those specifically formulated to bond various materials effectively and withstand temperature fluctuations.
- Silicone Adhesive: Known for its flexibility and durability, silicone adhesive is ideal for bonding rubber and plastic materials commonly found in gaskets.
- Epoxy Resin: This two-part adhesive creates a strong, permanent bond that can fill gaps and is resistant to moisture and temperature changes.
- Super Glue (Cyanoacrylate): Super glue offers a quick bond and is effective for minor repairs, but it may not withstand extreme temperatures as well as other options.
- Contact Cement: Excellent for bonding large areas, contact cement provides a strong initial tack and works well with rubber and other flexible materials.
Silicone adhesive is particularly beneficial for refrigerator gaskets due to its ability to retain flexibility even after curing, making it less likely to crack under temperature variations. Additionally, it is water-resistant, which helps maintain a good seal in moist environments.
Epoxy resin is a robust choice for those requiring a solid, inflexible bond. It can handle both heat and cold, making it suitable for gaskets that experience significant temperature changes. Its gap-filling properties also make it a great option for uneven surfaces.
Super glue is often favored for quick fixes due to its fast-setting nature, allowing for immediate use. However, its bond may become brittle over time, especially in high-temperature areas, so it is best used for minor repairs rather than complete gasket attachments.
Contact cement is favored for its strong initial hold and ability to bond large surfaces. This type of adhesive is particularly useful when needing to attach gaskets that require a smooth and even application, although it requires careful application since it cannot be repositioned once bonded.
How Can You Effectively Apply Glue to a Refrigerator Gasket?
To effectively apply glue to a refrigerator gasket, it’s essential to choose the right adhesive and follow proper application techniques.
- Choosing the Right Glue: Selecting the best glue for refrigerator gaskets involves considering its temperature resistance and bonding strength. A silicone-based adhesive or a polyurethane glue is often recommended due to their flexibility and durability, allowing them to withstand the constant opening and closing of the refrigerator door.
- Preparing the Surface: Before applying the glue, ensure that the surfaces are clean and dry. Wipe down the gasket area with a mild detergent to remove any dirt or residue, and allow it to dry completely to ensure a strong bond.
- Applying the Glue: When applying the glue, use a thin, even layer to avoid excess that could interfere with the gasket’s sealing capabilities. A small bead along the edge of the gasket is typically sufficient, and it’s best to apply it in a continuous motion to prevent gaps.
- Securing the Gasket: After applying the glue, carefully press the gasket into place and hold it securely for a few minutes to ensure proper adhesion. If necessary, use clamps or weights to keep the gasket in position while the glue cures, following the manufacturer’s recommended drying time.
- Testing the Seal: Once the glue has set, test the seal by closing the refrigerator door and checking for air leaks. A simple method is to place a piece of paper between the door and the gasket; if it slides out easily, the seal may need further adjustment or additional glue.
What Precautions Should be Taken When Using Glue on Gaskets?
When using glue on gaskets, particularly for appliances like refrigerators, it’s essential to follow specific precautions to ensure effective adhesion and safety.
- Surface Preparation: Ensure that both the gasket and the surface it will adhere to are clean, dry, and free from any grease or debris. Any residue can prevent the glue from forming a strong bond and may lead to leaks or failures in the gasket’s function.
- Choose the Right Glue: Use a glue specifically designed for rubber or silicone gaskets, as these will provide the best adhesion and flexibility needed for the application. Some glues may not withstand temperature changes or may degrade over time when exposed to moisture, which is common in refrigerators.
- Apply Evenly: Apply the glue in a thin, even layer to both surfaces to ensure uniform adhesion. Thick applications can lead to uneven bonding and may cause the gasket to fail or peel away from the surface over time.
- Allow Adequate Drying Time: Follow the manufacturer’s instructions regarding drying and curing times, as this is crucial for achieving optimal bond strength. Rushing this process can lead to premature failure of the gasket.
- Ventilation: Work in a well-ventilated area to avoid inhaling fumes that may be released during the gluing process. Some adhesives can emit strong odors or harmful vapors that can be irritating or harmful to health.
- Wear Protective Gear: Use gloves and eye protection while handling glue to prevent skin contact and eye irritation. Some adhesives can cause allergic reactions or skin irritation, so personal safety should always be a priority.
When Should You Repair vs. Replace a Refrigerator Gasket?
| Aspect | Repair | Replace |
|---|---|---|
| Cost | Generally lower cost, mainly for adhesive and labor. | Higher initial investment, but may save money in long run. |
| Longevity | May last for a few more years if done properly. | New gaskets typically have a longer lifespan. |
| Ease of Repair | Can be a simple DIY project with the right glue. | Installation may require professional help, depending on complexity. |
| Energy Efficiency | Improperly repaired gaskets can lead to energy loss. | New gaskets ensure proper sealing, improving efficiency. |
| Recommended Adhesives | Use silicone adhesive or rubber gasket adhesive for repairs. | N/A |
| Signs of Failure | Visible tears, minor wear, or loss of suction. | Severe cracks, constant moisture buildup, or visible deformation. |
| Risks | Using the wrong adhesive can lead to further damage or short-term fixes. | Eliminates risk of improper sealing. |
How Do You Know if Your Gasket Needs Replacement?
Knowing whether your gasket needs replacement can help maintain the efficiency of your refrigerator.
- Visible Damage: Check for tears, cracks, or warping in the gasket material.
- Air Leaks: Perform a simple test by closing the door on a piece of paper; if it slides out easily, your gasket may not be sealing properly.
- Frost Buildup: Excessive frost or ice accumulation inside your refrigerator or freezer can indicate a malfunctioning gasket.
- Condensation: Noticeable moisture or water pooling around the refrigerator can suggest that the gasket is not providing a proper seal.
- Increased Energy Bills: A significant rise in electricity costs may point to an inefficient refrigerator, potentially due to a failing gasket.
Visible damage to the gasket can compromise its ability to create a proper seal, allowing air to escape and leading to energy inefficiency. Look for any physical signs such as cracks, tears, or signs of wear that would necessitate a replacement.
Air leaks can be easily tested with a piece of paper. Close the refrigerator door on the paper; if it can be pulled out with little resistance, this indicates that the gasket is not sealing tightly, which can lead to increased energy consumption and food spoilage.
Frost buildup is another clear indicator that the gasket is failing. When the gasket does not seal properly, warm air enters the refrigerator, leading to condensation that freezes and creates unwanted frost, particularly in the freezer section.
Condensation around the refrigerator is a sign of poor sealing. If you notice moisture or water pooling on the floor or around the edges, it could mean that the gasket is not fitting snugly, allowing warm air to enter and moisture to form.
Lastly, if you experience a significant increase in your energy bills, it may be time to inspect your gasket. An inefficient refrigerator due to a faulty gasket can cause the appliance to work harder, resulting in higher energy costs over time.
Related Post: